
Frozenthunderbolt
Well-Known Member
Hey gang,
Having made a chaveta (tobacco knife) I decided I wanted something to protect the blade (and my fingers) so here is the build process for a knife block to hold it safe. Enjoy!
1. Find some wood - I had some semi-seasoned red? Alder - rough sawn with a chainsaw - split it in half along a check line with a hatchet. I made my first mark to cut at 90ish degrees (by eye) to what I though my baseline would be, then I cut that end off
2. Using the first cut as a straight edge I used my square to get a true baseline for it to sit on:
3. Cut along the line long enough to hold your knife and leave 2-3 cm either side. NOTE: I have deliberately left the scrap on to give me something to clamp into the vice without damaging the good bits of my project
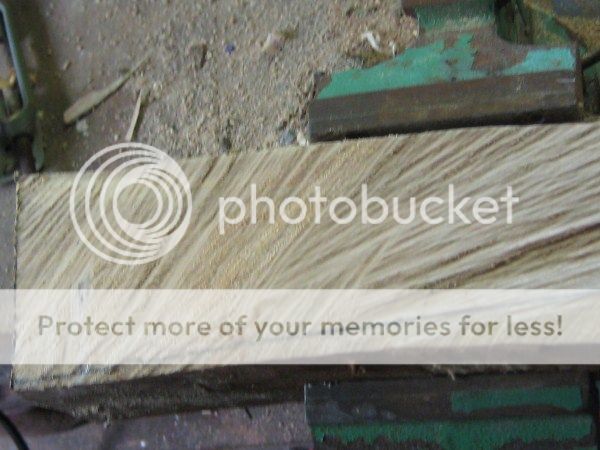
4. plane it roughly smooth - I used an electric plane - great for rough planing, crap for fine work. I know from past experience alder doesn't plane that well so I'm ok with this.

5. I hoped my trick of scrap clamping would let me get away with touch up sanding only later so I sanded the exposed end and 3 sides but not the base through 3 grades of paper 60, 120 and 240 (the pic is past through 60 grit)

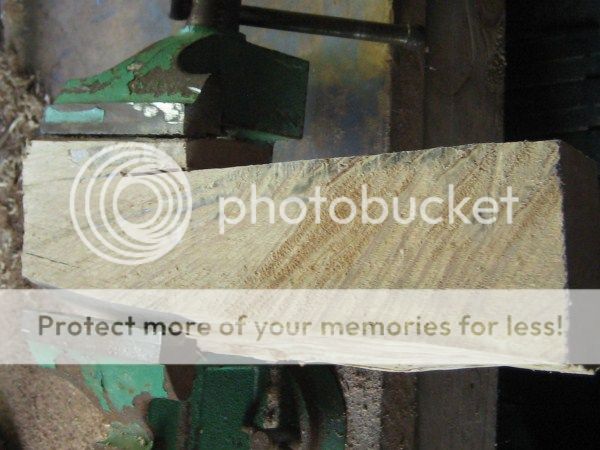
6. Use your square off the bottom cut and cut off an end cap 1-2 cm wide

7. Mark a line down the center of the top and set your jigsaw to the right angle to be square to the top of your wood (mine was sloped)
8. Check the knife to see that it fits - I found I had to ream out the slot with the jigsaw to get it to slip in nicely.
9. Rout/ Chisel a recess if you want - I had initially planed to straight rout and then cove the edges for the handle to sit into, but came to see that if I took it that deep my blade would come out the bottom! So I used a gouge to take out a bit less instead - made it look a bit more organic like the handle of the knife, so that's cool.

10. Slipped the knife back in and marked with a pencil where to trim a bit more out with the gouge to get a better fit with the handle - didn't end up mating perfectly but good enough

11. Now I knew how long the slot was and how much to leave I marked where to cut off, then erred on the side of caution and added a bit more to make it stronger and remarked. Note: This is when I cut the block off the scrap. Make sure you catch your block as it falls free - don't let it hit the floor; you'll swear the air blue (didn't do that THIS build)
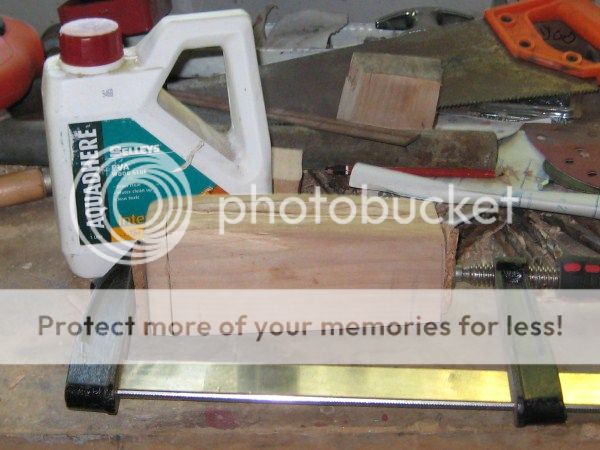
12. Line up your bits ready to glue and clamp. I used standard woodworking PVA, a gap-filling glue like gorilla glue would probably also be good. NOTE - I had some pieces of cork tile I sat on the ends so the clamp wouldn't mark my work - don't glue them!
13. Since I can't do a project without dog's balls-ing something here you go - the end cap had been lightly sanded to remove the edge burr my jigsaw left - this meant the end cap didn't line up perfectly, so, after drying in the clamp 24 hours I had to re-sand the entire thing through all 3 grades instead of just the one end that was previously attached to the scrap! It also meant I ended up with a visible glue line which pisses me off - I may ream it and inlay a bit of copper wire for pretty and to cover it up at a later date.
Here it is finished and oiled though
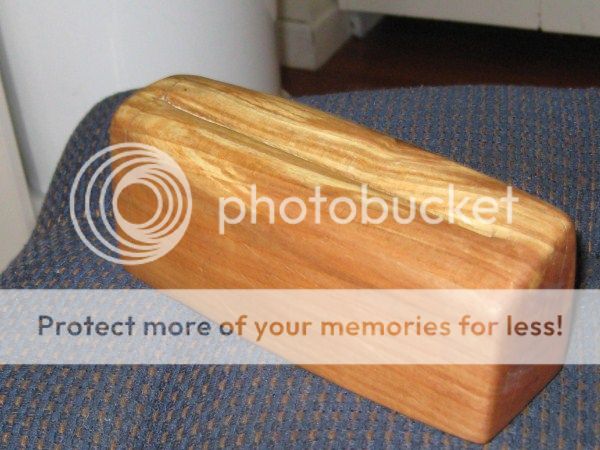
14. Happy sharp blades and (mostly) uncut fingers!

Having made a chaveta (tobacco knife) I decided I wanted something to protect the blade (and my fingers) so here is the build process for a knife block to hold it safe. Enjoy!
1. Find some wood - I had some semi-seasoned red? Alder - rough sawn with a chainsaw - split it in half along a check line with a hatchet. I made my first mark to cut at 90ish degrees (by eye) to what I though my baseline would be, then I cut that end off
2. Using the first cut as a straight edge I used my square to get a true baseline for it to sit on:
3. Cut along the line long enough to hold your knife and leave 2-3 cm either side. NOTE: I have deliberately left the scrap on to give me something to clamp into the vice without damaging the good bits of my project
4. plane it roughly smooth - I used an electric plane - great for rough planing, crap for fine work. I know from past experience alder doesn't plane that well so I'm ok with this.
5. I hoped my trick of scrap clamping would let me get away with touch up sanding only later so I sanded the exposed end and 3 sides but not the base through 3 grades of paper 60, 120 and 240 (the pic is past through 60 grit)
6. Use your square off the bottom cut and cut off an end cap 1-2 cm wide
7. Mark a line down the center of the top and set your jigsaw to the right angle to be square to the top of your wood (mine was sloped)
8. Check the knife to see that it fits - I found I had to ream out the slot with the jigsaw to get it to slip in nicely.
9. Rout/ Chisel a recess if you want - I had initially planed to straight rout and then cove the edges for the handle to sit into, but came to see that if I took it that deep my blade would come out the bottom! So I used a gouge to take out a bit less instead - made it look a bit more organic like the handle of the knife, so that's cool.
10. Slipped the knife back in and marked with a pencil where to trim a bit more out with the gouge to get a better fit with the handle - didn't end up mating perfectly but good enough
11. Now I knew how long the slot was and how much to leave I marked where to cut off, then erred on the side of caution and added a bit more to make it stronger and remarked. Note: This is when I cut the block off the scrap. Make sure you catch your block as it falls free - don't let it hit the floor; you'll swear the air blue (didn't do that THIS build)
12. Line up your bits ready to glue and clamp. I used standard woodworking PVA, a gap-filling glue like gorilla glue would probably also be good. NOTE - I had some pieces of cork tile I sat on the ends so the clamp wouldn't mark my work - don't glue them!
13. Since I can't do a project without dog's balls-ing something here you go - the end cap had been lightly sanded to remove the edge burr my jigsaw left - this meant the end cap didn't line up perfectly, so, after drying in the clamp 24 hours I had to re-sand the entire thing through all 3 grades instead of just the one end that was previously attached to the scrap! It also meant I ended up with a visible glue line which pisses me off - I may ream it and inlay a bit of copper wire for pretty and to cover it up at a later date.
Here it is finished and oiled though
14. Happy sharp blades and (mostly) uncut fingers!