
If you already prime your leaf, then you have settled on a method that works. This is my approach to stringing and labeling my small quantities of 16 varieties (typically 4 to 8 plants per variety).
My toolset is a bushel basket ($3 at a fruit market); 17 gauge galvanized wire, cut into 15"+ segments; large craft sticks (tongue depressor size, available at Walmart by the packet or by the box) drilled in three places and cut into thirds; a Sharpie; a steel skewer (from the supermarket); a beat-up old paring knife from the kitchen. I make up the wire segments and the wood tags ahead of time, then everything goes out to the tobacco patch.

I can generally fit 12 to 16 leaves (a small "hand") per segment of wire, depending on the leaf size. In this set of pictures, I am priming the mud lugs from Florida Sumatra. Some growers (including the Cubans) would discard these. I consider the two bottommost leaves true mud lugs. Mud lugs will cure to a leaf that has little nicotine, little flavor, but may have a nice aroma and burn well. So I use them for filler.
Burley needs to be yellowing on the plant when primed. Most others will simply display a lighter green than the younger leaves, and a bumpier texture. Another sign of leaf maturity is a loss of flexibility. The old books suggested folding the tip of the leaf to see if it breaks. Not my leaf! You can thump the end of the leaf with the back of your finger. If it feels yielding, then it's not ready. If it resonates like a loose drum, it's mature. When it comes to mud lugs, I don't even bother to check them. A week or so after priming or bagging, the mud lugs come off. Some are tattered; some are already yellowing, but most are in fairly good shape. After the mud lugs, I try to avoid allowing any leaf to deteriorate on the stalk.
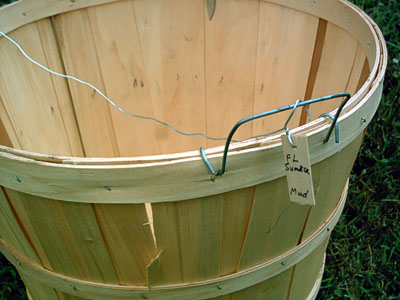
The tag is marked on both sides for a particular variety and leaf position, and is then twisted into a wire and hooked onto a handle of the basket.

This particular basket has a handy gap in the rim that allows me to support a leaf stem over it, while the skewer punctures it and passes into the gap.

I find this considerably easier than fiddling with puncturing the stem with the galvanized wire initially.

The leaves are strung face to face/back to back. For huge leaves, I carefully nest the leaves down into the basket. This worked for 36" Hickory Pryor leaves.

Next stop is the aluminum clothes line, which gets some morning, then some late afternoon sun. These mud lugs were sprayed with a garden hose prior to hanging, since they really were muddy. If the weather cooperates, then the leaves are completely wilted by the following day. The wire is then taken to the shed and attached (accompanied by its tag) to one of the nylon ropes strung in my shed. I try to avoid taking wet leaf to the shed.
In the past, I've allowed Samsun to fully yellow on the line, and this happily turned out well.
Bob
My toolset is a bushel basket ($3 at a fruit market); 17 gauge galvanized wire, cut into 15"+ segments; large craft sticks (tongue depressor size, available at Walmart by the packet or by the box) drilled in three places and cut into thirds; a Sharpie; a steel skewer (from the supermarket); a beat-up old paring knife from the kitchen. I make up the wire segments and the wood tags ahead of time, then everything goes out to the tobacco patch.
I can generally fit 12 to 16 leaves (a small "hand") per segment of wire, depending on the leaf size. In this set of pictures, I am priming the mud lugs from Florida Sumatra. Some growers (including the Cubans) would discard these. I consider the two bottommost leaves true mud lugs. Mud lugs will cure to a leaf that has little nicotine, little flavor, but may have a nice aroma and burn well. So I use them for filler.
Burley needs to be yellowing on the plant when primed. Most others will simply display a lighter green than the younger leaves, and a bumpier texture. Another sign of leaf maturity is a loss of flexibility. The old books suggested folding the tip of the leaf to see if it breaks. Not my leaf! You can thump the end of the leaf with the back of your finger. If it feels yielding, then it's not ready. If it resonates like a loose drum, it's mature. When it comes to mud lugs, I don't even bother to check them. A week or so after priming or bagging, the mud lugs come off. Some are tattered; some are already yellowing, but most are in fairly good shape. After the mud lugs, I try to avoid allowing any leaf to deteriorate on the stalk.
The tag is marked on both sides for a particular variety and leaf position, and is then twisted into a wire and hooked onto a handle of the basket.
This particular basket has a handy gap in the rim that allows me to support a leaf stem over it, while the skewer punctures it and passes into the gap.
I find this considerably easier than fiddling with puncturing the stem with the galvanized wire initially.
The leaves are strung face to face/back to back. For huge leaves, I carefully nest the leaves down into the basket. This worked for 36" Hickory Pryor leaves.
Next stop is the aluminum clothes line, which gets some morning, then some late afternoon sun. These mud lugs were sprayed with a garden hose prior to hanging, since they really were muddy. If the weather cooperates, then the leaves are completely wilted by the following day. The wire is then taken to the shed and attached (accompanied by its tag) to one of the nylon ropes strung in my shed. I try to avoid taking wet leaf to the shed.
In the past, I've allowed Samsun to fully yellow on the line, and this happily turned out well.
Bob


