Buy Tobacco Leaf Online | Whole Leaf Tobacco

deluxestogie Grow Log 2014

Status
Not open for further replies.

deluxestogie

Administrator
Staff member
Joined
May 25, 2011
Messages
24,015
Points
113
Location
near Blacksburg, VA
Hey Bob..have things got warm enough to get some starts going? Hey also my little dutch is flowering quite short compared to the dutch ohio..most pics I've seen of little are pretty small. .but just wondering what's the usual expected flowering height of it.?
My Little Dutch is typically about 3' (~1 meter) in height. For starts, I allow about 2 months for the seedlings to be ready for transplant. So I'll start seed in early to mid March.

Thanks Bob, Any idea how many bags it takes to do a certain no. of trays.
BT
You would think that I should have a record of that, or at least a rough idea, but I don't. I'm going to guess somewhere in the range of 1 gallon of mix per 1020 tray of insert. (It could be half again that amount.)

Bob
 

DGBAMA

Well-Known Member
Joined
Feb 10, 2013
Messages
4,418
Points
63
Location
NORTH ALABAMA
BT, I bought a 50lb bag of soil for my starting trays. Filled 9 72 cell 10-20s with about half a 5 gal bucket to spare. Weight is not a good measure of volume but should give an idea.
 

Brown Thumb

Well-Known Member
Joined
May 4, 2012
Messages
4,057
Points
113
Location
Pa
BT, I bought a 50lb bag of soil for my starting trays. Filled 9 72 cell 10-20s with about half a 5 gal bucket to spare. Weight is not a good measure of volume but should give an idea.
Thanks, this should be spot on with 13 trays to do. Maybe a tray or two short.
Was that with Bobs 3-1-1 Mix also?
 

deluxestogie

Administrator
Staff member
Joined
May 25, 2011
Messages
24,015
Points
113
Location
near Blacksburg, VA
I should remind folks that for watering from the bottom, the inserts are just gravity-filled with mix, and NOT compacted into each cell. This allows proper wicking, and minimizes spiral roots.

Bob
 

Brown Thumb

Well-Known Member
Joined
May 4, 2012
Messages
4,057
Points
113
Location
Pa
Thanks Bob, First year not using straight potting mix.
I always have to run out to the store to get more also.
I am keeping track of it this yr.
BT
 

DGBAMA

Well-Known Member
Joined
Feb 10, 2013
Messages
4,418
Points
63
Location
NORTH ALABAMA
Thanks Bob, First year not using straight potting mix.
I always have to run out to the store to get more also.
I am keeping track of it this yr.
BT

I am using "baccto" brand PEAT, bought at our local Farmers CO-OP. Straight from the bag it is finely graded and appears to be a nearly black mix of Peat Moss & a high organic content Loam type soil. It wicks exceptionally well, to the point of acting like a sponge. The starts loved it last year and the 50lb bag is only $7.
 

jekylnz

Well-Known Member
Joined
Jan 19, 2013
Messages
1,357
Points
48
Location
Auckland, New Zealand, New Zealand
I am using "baccto" brand PEAT, bought at our local Farmers CO-OP. Straight from the bag it is finely graded and appears to be a nearly black mix of Peat Moss & a high organic content Loam type soil. It wicks exceptionally well, to the point of acting like a sponge. The starts loved it last year and the 50lb bag is only $7.

$7 for 50lb is good value. .do most you guys use a pretty straight mix of peat moss for your starts?
 

deluxestogie

Administrator
Staff member
Joined
May 25, 2011
Messages
24,015
Points
113
Location
near Blacksburg, VA
Seed Starting

Garden20140310_1122_seedStartingCups01_500.jpg


Two days ago, I washed all of my starting cups (Ball 8 oz. plastic freezer jars) and their lids. Yesterday, I mixed up my starting mix in a 5 gallon bucket. For germination I use about 5 parts Miracle Gro Sphaegnum Peat and 1 part Vermiculite. (Later, for the 1020 tray inserts, Pearlite will be added.)

Each cup received a scoop of mix, a bit over 1/8 cup of water, and was misted with water on the top surface.

Labels are cut from a Tyvek mailing envelope (2 per variety), and marked with an extra-fine Sharpie. Labels are attached using a rectangle of packing tape (with a corner turned under, for easy removal). Both the cup and its lid are labeled. Lids are kept in place until the jar is ready to be seeded.

One cup at a time is brought to the counter, and seed is sprinkled lightly over the surface. This minimizes the likelihood of variety mixing. The cup is again closed, then removed from the counter.

The seeded cups are placed onto a metal cookie sheet.

The surface of the wire shelf (on my enclosed back porch) is mounted at window level for direct sunlight. It's first overlaid with a thin sheet of bubblewrap--for insulation, then with a seedling heat mat. The cookie sheet rests directly on the heat mat.

Garden20140310_1124_seedStartingCups02_500.jpg


At night, the heat mats are left on, but are disconnected during times when there is direct sunlight on the germination cups. A simple thermometer allows me to get a rough idea of the temperature. I try to keep it above 75ºF, and below 85ºF. If needed, a couple of layers of Agribon-AG15 are placed over the cups to shield them from the sun.

I will ignore these for 3 days, then begin looking for germinated seed. As soon as I see definite germination, seed will be transferred one at a time into the 1020 tray inserts--one germinated seed per cell.

Meanwhile, I will be marking my Popsicle sticks for each variety--usually one stick per insert cell group. That's a lot of sticks, but minimizes confusion.

Bob
 

DGBAMA

Well-Known Member
Joined
Feb 10, 2013
Messages
4,418
Points
63
Location
NORTH ALABAMA
Thanks for that Bob, I Wondered about moving germinated seed, as opposed to letting them actually start, then transplanting them to cells.
 
Last edited by a moderator:

deluxestogie

Administrator
Staff member
Joined
May 25, 2011
Messages
24,015
Points
113
Location
near Blacksburg, VA
Transfering Germinated Seed to Trays

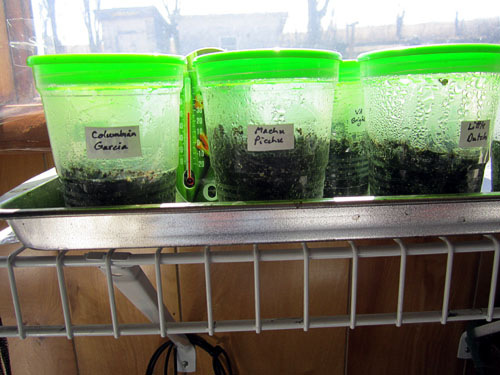
There are many ways to end up with a single seedling per 1020 tray cell. Rather than sprinkling seed into each cell, and then thinning afterwards, my preference is to germinate in an easily sealed, warmed and isolated cup, then transfer the germinated seed to the cells.

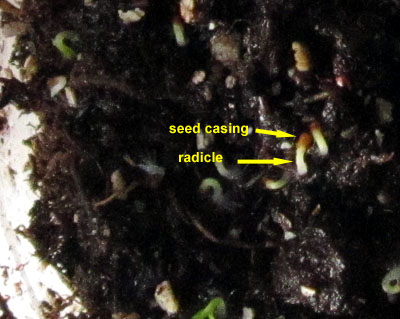
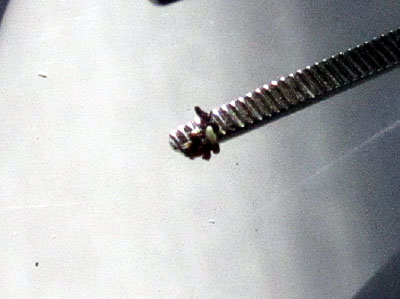
Tobacco seed (which starts off at about 1/2 mm in size--500 microns), when exposed to germination conditions (warmth, moisture) will first swell, then elongate. This is visible to the naked eye. More dramatic is the moment its root radicle ruptures the seed casing and emerges. Since the radicle is bright white, it stands out like (in BigBonner's words) a Christmas light. This makes the germinated seed easy to spot, and easy to transfer singly to a cell.

Garden20140314_1125_emergedRadicle_400.jpg


Within a few hours of radicle emergence, green cotyledons may appear.

Garden20140314_1126_sproutlings_400.jpg


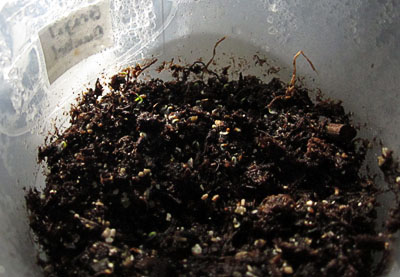
I wait until enough sproutlings of a particular variety have emerged to set up all the cells for that variety, then do the transfer. For small growouts (for seed refresh or for curiosity), I start 8 cells, and transplant 4 to the field. For larger grows, I provide 4 to 8 extras per variety.

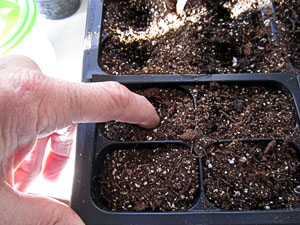
I begin by adding a quart of water to the bottom of the tray. (Remember that I use a nesting of trays: web; solid 1020; drained 1020; cell inserts.) After making a divot in the center--with my fingertip--I then mist the upper surface of each of the cells that will immediately be started for a particular variety.

Garden20140314_1127_fingerDibble_300.jpg


The little depression makes it much easier to transfer the sprout, and also maintains a more moist environment surrounding the sprout.

Transferring the sprouted seed can be done with a toothpick. I prefer using one blade of a forceps.

Garden20140314_1129_germinatedSeedOnForcep_400.jpg


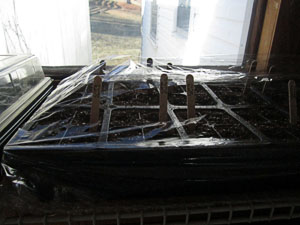
After all the sprouted seeds for a single variety have been placed, I then lightly mist each of those cells once more, to settle the wee sproutlet. Each separatable pack of cells (4 per pack in my case) gets its own Popsicle stick label with the variety name. I never mix varieties within a pack.

Because the transferred sprouts are still quite vulnerable to drying out, I keep them covered with a clear dome for the next few days or so. When I run out of domes, a cover of plastic wrap works as well--it's just something of a nuisance to handle.

Garden20140314_1130_plasticWrapOnTray_300.jpg


So far, I have completed this process for about half of this season's grow.

Bob
 

Planter

Well-Known Member
Joined
Feb 21, 2014
Messages
255
Points
28
These are strong looking seedlings... so most took just 3 days?
 

cigarchris

Well-Known Member
Joined
Mar 14, 2014
Messages
70
Points
0
Location
Pittsburgh
Hey Bob,
I just started an account on FTT so I could keep in touch with you (since you're no longer on the other forum).
Looking great so far this year. I'll be right behind you with seedlings, about two weeks till I start. Pittsburgh's final frost is usually mid to late May.
I think I'm only going to do four strains this year, looking for some input though. My main purpose is cigars, but I think I want to try a single strain of something Turkish.
Your Celikhan and Prilep last year seemed to impress many people. I'm definitely doing some PA broadleaf (seeds from LeafOnly in CT). I'd like to try FL Sumatra again this year, but I need to make sure it gets more sun than last year. As for the last strain, I was thinking either PA Red (not sure if this is close to PA broadleaf, but I don't believe it is, as PABL is a sub strain of CTBL from my understanding), or one of the Havana strains, 142 or 608, or possibly Criollo 98. My Habano 2000 from last year didn't do too well, but it was close to the Sumatra, and also probably didn't get enough sun. I'll be removing three small trees along the hillside in the back yard this year to get some more sun back there.
Best of luck!
Chris
 

deluxestogie

Administrator
Staff member
Joined
May 25, 2011
Messages
24,015
Points
113
Location
near Blacksburg, VA
Hey, Chris.

PA Red is not a broadleaf type. I grow it every year for cigar filler. Feel free to introduce yourself in, of all places, the Introduce Yourself forum. And, of course, start a grow log in the Grow Blogs section. You'll find some familiar folks here. Best of wishes for your 2014 grow.

Bob
 

Nikfits

Well-Known Member
Joined
Jan 17, 2014
Messages
152
Points
0
Location
Georgia
After starting seeds this year in the cell trays. I know how I'll be starting them next year. It seemed like double the work in the cells. I'm glad to have started them the way I did, for the experience. With one cell, I could have filled a half a tray or more. The germination rate was great. After seeing how you move them into cells (I was calling them little legs in my notes) it looked so much easier.

Good luck with your grow this year.

Gary
 

DGBAMA

Well-Known Member
Joined
Feb 10, 2013
Messages
4,418
Points
63
Location
NORTH ALABAMA
Your method lends new credibility to the paper towel method. If just used for germinating, not starting. Thank you.
 

Planter

Well-Known Member
Joined
Feb 21, 2014
Messages
255
Points
28
The earliest germination was just under 72 hours. Now at ~4.5 days, most are showing at least some activity.

Bob

How long do you wait until you give up on a batch? I´m struggling somewhat with some Prilep seeds this year - is it worth waiting for longer than 2 weeks?
 

rainmax

Well-Known Member
Founding Member
Joined
Jan 5, 2013
Messages
982
Points
43
Location
Ljubljana, Slovenia
How long do you wait until you give up on a batch? I´m struggling somewhat with some Prilep seeds this year - is it worth waiting for longer than 2 weeks?

Usually Prilep start to germinate very soon. 3-5 days maximum. If it is from Ars-grin few days longer (in my case- probably older seeds) but two weeks?.. there is probably something wrong.
 
Status
Not open for further replies.
Top