Buy Tobacco Leaf Online | Whole Leaf Tobacco

cotillion's First Grow Blog 2014

Status
Not open for further replies.

cotillion

Well-Known Member
Joined
Mar 19, 2014
Messages
92
Points
8
Location
Chatham-Kent, Ontario
I’ve been considering growing my own tobacco for some time now. I used to do a fair bit of gardening but over the years I’ve gotten away from it and my wife has picked up the slack and grows wonderful vegetables and flowers. This year she decided she would like to do more indoor gardening as well as potted vegetables and “upside-down” tomatoes.

We have a vegetable garden that has grown excellent tomatoes and peppers and it gets nearly full sun. It is currently 12’ wide by 13.5’ feet deep. We will be transplanting many of the existing plants around this garden bed so I have some room to expand. This entire bed will be available to plant tobacco.

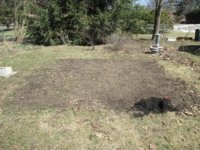
IMG_0171.jpgIMG_0172.jpg

(yes that is still snow on the ground :( )

My first concern is getting the appropriate nutrients in the soil. The tomatoes and peppers have probably sucked a lot of the good stuff out. I can get composted cattle and sheep manure easily, if I were to prepare the soil with that would it be sufficient or are there other nutrients I should add? I am 7-8 weeks away from planting. With vegetables I would just add the manure when I planted but would it be of any benefit adding beforehand?

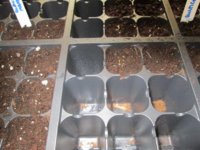
I don’t smoke any more but I do enjoy nasal snuff, snus, and dip. Most of my tobacco consumption is snuff now so I picked out three types of tobacco with that in mind: Small Stalk Black Mammoth, Virginia Gold, and Indian Tobacco (rustica). I started the seeds this past Saturday in a 72 cell tray. I used 12 cells each for both the Black Mammoth and Virginia and 16 for the rustica. The empty cells can be filled as I cull the healthy plants among the ones I’ve started but I’ll likely end up with way more plants than I have room for. I do have a couple of friends interested in putting a few plants on their properties so that could help.

IMG_0156.jpg


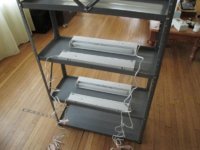
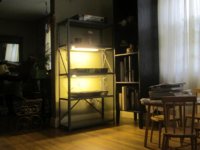
After sowing the seeds on Saturday (which was more difficult than I thought it would be due to the miniscule size of them) I’ve placed the tray on top of the refrigerator and gave them a good misting this morning. Once they have sprouted I will be using this shelf:
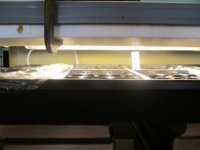
IMG_0148.jpgIMG_0152.jpg


Those are under-the-counter style fluorescent lights which we have affixed with velcro. I picked them up on clearance from Home Depot for $11 each. Since we set this up on Saturday the adhesive from the velcro has become unglued from the bottom of the shelf on a couple of them so we will be reinforcing them with something a little more sticky before I place the tobacco plants under them. I’ll just elevate the trays from below to get them as close to the lights as necessary.

I suppose one advantage of living where I do is that I get to read many grow blogs as they get started before I can start mine but the anticipation is killing me. I’ve read some excellent tips and it’s gotten me really excited to get things going here. Good luck everybody, if there are any tips or input for what I am doing please let me know! As I get things going my next mission is to find some spearmint seed so I can make my wife some Thunder Frosted mini portions. That should be a challenge ;)
 

Knucklehead

Moderator
Founding Member
Joined
Oct 18, 2012
Messages
12,196
Points
113
Location
NE Alabama
It looks like you're doing fine so far. Best of luck with your season. If you have any questions just ask away, we're here to help.
Cheers.
 

deluxestogie

Administrator
Staff member
Joined
May 25, 2011
Messages
24,015
Points
113
Location
near Blacksburg, VA
The composted manure should work well. I would suggest working it into the soil well, as soon as the ground has thawed. It's hard to know what its composition is, but I would just spread it maybe 1/4" thick over the planting area.

Your growing area will likely allow only ~32 plants, while leaving adequate access to manage them. Below is a diagram from my 2012 grow log. My beds are 5' x 12' each with a wide path between them. Access with this arrangement has never been a problem.

Garden2012_Tobacco_beds1-2_400.jpg


You could do a pair of beds, with a 3-1/2' path between them. (just ignore the notes at the bottom of each bed)

Bob
 

cotillion

Well-Known Member
Joined
Mar 19, 2014
Messages
92
Points
8
Location
Chatham-Kent, Ontario
That picture is worth a thousand words Bob. I saw in one of your previous posts how you plant them on the diagonal to take full advantage of your space. I'll model my plan on that. Around 32 plants will be more than enough for me this year.
 

DGBAMA

Well-Known Member
Joined
Feb 10, 2013
Messages
4,418
Points
63
Location
NORTH ALABAMA
Welcome. Looks like a good plan going.

The rustica will be shorter than the other two, so keep them toward an edge of the patch so they are not shaded over by the big ones.
 

Rickey60

Well-Known Member
Joined
Aug 14, 2013
Messages
878
Points
0
Location
SW Mississippi
Welcome! Looks like you just jumped right on in, good work. I like you setup. It seems you have learned a lot. Good luck.
 

cotillion

Well-Known Member
Joined
Mar 19, 2014
Messages
92
Points
8
Location
Chatham-Kent, Ontario
After waiting impatiently for a week some progress:

IMG_0208.jpg

The rustica have started to sprout and are looking fine but now I have a dilemma. The tray I've started my seeds in is just one solid tray with 72 cells. The Black Mammoth and Virginia are showing no signs of sprouting yet. From my reading, once the seeds have all sprouted they should be moved under the lights. It looks like my rustica are going to need to be moved far ahead of the others. Can I leave the rustica in the tray, covered and in the semi-darkness and wait for the other two to catch up? Or can I place the tray under the lights as soon as the rustica is ready without negatively affecting the others? I suppose I could take the scissors to the tray and remove the rustica section and get them under the light but would rather not if it's not necessary.
 

deluxestogie

Administrator
Staff member
Joined
May 25, 2011
Messages
24,015
Points
113
Location
near Blacksburg, VA
Just place a section of plastic wrap (Saran wrap) over any ungerminated cells, and move the whole shebang under the lights. Water from the bottom.

Bob
 

Mad Oshea

Taking a break
Joined
Sep 30, 2013
Messages
1,863
Points
0
Location
Albuquerque New Mexico (USA)
You will find that alot of Us use a plant map times two or three (miss placement of map) Some kind of ground markers or even plant tags for each type planted so We don't forget what it is. Nice set up- Looks like You have been at it for a few years now LOL. Good job.
 

Knucklehead

Moderator
Founding Member
Joined
Oct 18, 2012
Messages
12,196
Points
113
Location
NE Alabama
I noticed no water in the tray to the right. Keep the bottom tray about 1/4 to 1/3 full of water and let the water wick up the soil column to keep the soil moist. By only watering from the top, you stand a chance of having the top dry out before you know it and kill the partially germinated seed or very tiny seedlings. They should be kept moist until they get a good root system, then start letting them get semi-dry between waterings after that, but water from the bottom, into the bottom tray.
 

DonH

Well-Known Member
Joined
Jun 10, 2012
Messages
1,609
Points
0
Location
Massachusetts
You will find that alot of Us use a plant map times two or three (miss placement of map) Some kind of ground markers or even plant tags for each type planted so We don't forget what it is. Nice set up- Looks like You have been at it for a few years now LOL. Good job.
What I do to make sure I don't lose my map is scan it or take a picture of it. Easy backup.
 

cotillion

Well-Known Member
Joined
Mar 19, 2014
Messages
92
Points
8
Location
Chatham-Kent, Ontario
Just place a section of plastic wrap (Saran wrap) over any ungerminated cells, and move the whole shebang under the lights. Water from the bottom.

Bob

Thanks, I wasn't sure at all what I should do. I didn't take into account the different germination times between varieties. Lesson learned for next year - I'll make sure I can move different ones under lighting independently. There's a pic of what I have now below.

You will find that alot of Us use a plant map times two or three (miss placement of map) Some kind of ground markers or even plant tags for each type planted so We don't forget what it is. Nice set up- Looks like You have been at it for a few years now LOL. Good job.

There is so much good info here. I wouldn't know where to begin if not for this forum but I've been able to get a rough idea of what to do from reading other grow blogs. Mapping is another thing I would not have thought of but now I see how it will maximize my growing space. Speaking of growing space - I'm going to annex a bit more land for my garden because I have a feeling that I'll have much more plants than I expected! :cool:

I noticed no water in the tray to the right. Keep the bottom tray about 1/4 to 1/3 full of water and let the water wick up the soil column to keep the soil moist. By only watering from the top, you stand a chance of having the top dry out before you know it and kill the partially germinated seed or very tiny seedlings. They should be kept moist until they get a good root system, then start letting them get semi-dry between waterings after that, but water from the bottom, into the bottom tray.

When I sowed the seeds last Saturday I made sure the soil in the cells were wet but not soaking. I then sprinkled a very small amount of soil on top of the moistened stuff in the cells and gave it all a light spritzing with water. I sowed my seeds on top of that and put the lid on and placed the tray on top of the fridge. I figured with the moisture I'd supplied it should do the trick other than a spritzing every day or two. Now that things are moving along nicely I have about a quarter inch of water in the bottom of the tray and I've moved the works under the lights.

IMG_0209.jpg
 

rainmax

Well-Known Member
Founding Member
Joined
Jan 5, 2013
Messages
982
Points
43
Location
Ljubljana, Slovenia
Good luck cotillion. Let there be light.
Check for water regularly and read grow logs.
Make another batch of seeds for backup. Just incase. Positively thinking.
Start making plan how to dry and store all this tobacco.
 

cotillion

Well-Known Member
Joined
Mar 19, 2014
Messages
92
Points
8
Location
Chatham-Kent, Ontario
Good news, the Black Mammoth has started to come up. Just waiting on the Virginia now.

Make another batch of seeds for backup. Just incase.

That's another thing I hadn't considered. I only got 50 seeds of each and sowed them all but it would have been a good idea to order some extra.
 

cotillion

Well-Known Member
Joined
Mar 19, 2014
Messages
92
Points
8
Location
Chatham-Kent, Ontario
Well now I find myself wishing I'd ordered some extra seeds - the Virginia are not showing any signs of sprouting. I think I got them too wet while trying to keep the other two moist. It's been 12 days. I'm still holding out hope though. Going to keep them uncovered from this point on.

IMG_0285.jpg
 

Brown Thumb

Well-Known Member
Joined
May 4, 2012
Messages
4,057
Points
113
Location
Pa
If you covered them with a little dirt they do take longer to come up.
I did it that way also this year. Give them a couple of more days.
BT
 

cotillion

Well-Known Member
Joined
Mar 19, 2014
Messages
92
Points
8
Location
Chatham-Kent, Ontario
Well, no joy with the Virginia. I'll chalk that up to experience.

Here's the view of my garden this morning:

IMG_0291.jpg

We've really taken a pounding this winter. I hope the summer is more sane.

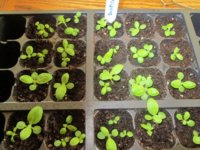
The rustica have been growing very well. I thought it would be a good time to thin them out a bit.

IMG_0293.jpg

I used a skewer to make a small hole in the cell then gently lifted out the seedlings using stamp collector's tweezers. I then placed the seedlings in the holes and gently firmed up the soil around the plants. It was very delicate work and I suppose it won't be long before I find out if I got it right or not.

The Black Mammoth are also growing well but they aren't nearly the size of the rustica so I'll just leave them alone for now.
 

Knucklehead

Moderator
Founding Member
Joined
Oct 18, 2012
Messages
12,196
Points
113
Location
NE Alabama
My Rusticas and Orientals are head and shoulders above everything else. It's funny that they will be some of the smallest plants in the patch later on.
 
Status
Not open for further replies.
Top