PART 1 of 4

Endoskeleton. The foam board goes on the outside.
Caveat
The wood-built kiln discussed here has several advantages over using a dead, upright freezer for a kiln, but will require more work to complete, and will certainly cost more.
Level of Difficulty
This kiln is not difficult to build, but is quite tedious, because of the many wood members and segments of XPS foam board. The cuts do not have to be all that precise. My choice of assembling the skeleton using deck screws (so that it can be disassembled, if need be) means a lot of drilling of pilot holes, and the placing of numerous long screws.
In contrast to Knucklehead's wood, home-built kiln, which is an exoskeletal wood frame built around an inner container of extruded polystyrene (XPS) foam board, my approach has been to construct a wood frame, with the XPS foam board on the outside of the wood skeleton. My endoskeletal frame weighs 23 pounds, excluding the shelves, XPS foam and casters. It is sturdy enough to easily support my body weight.
My initial idea was to design a simple, modular framework that could be enlarged by adding additional modules, joined to one another by wingnut bolts. That turned out to be impractical, and a needless complication. It was intended to be a marketable, enlargeable kiln kit that could be purchased.
Instead, I settled on a general design that allows a home-builder to decide on a specific set of dimensions (desired size, available space, etc.), and construct it in a similar fashion, from components readily available at most big-box home improvement stores: standard lumber, common deck screws, and Dow-Corning Foamular extruded polystyrene (XPS) insulation foam board.
If you happen to be skilled at cabinetry, then you may find the detailed commentary a bore. If you've never built anything yourself, the lengthy pointers will hopefully convince you that this really is easy to do--but it will take some time to complete. (Allow a week or two of spare-time work, or a day or two of full-time work for those more experienced.) I'm sure that even a novice will discover ways to make this simpler than what I have done.

Digital controller available on Ebay for about $15.00.
The only exotic component is its digital temperature controller, which is available for about $15 from a US-based vendor on Ebay. I have made an effort to use only simple tools to cut and assemble the kiln. The wiring is straightforward, and setting the controller is simpler than using a cell phone.
On deciding my dimensions, I measured the space available for a kiln. Another consideration is the dimensions (width) of your doorways, if you will need to move the assembled kiln from one room to another. My choice of foam insulation board (2" Foamular XPS foam) is based on its high R value (R=10), and its relatively high temperature stability (~170ºF), since I planned to use it as both a kiln and a flue-curing chamber. For the same reason, I selected a high-temperature, silicone door gasket material. If your intended use is only as a kiln, then you may choose to select less expensive foam, and a less expensive gasket material, though the electric cost increases with poorer insulation and sealing.
For the insulation board, I chose Dow-Corning 2" Foamular Extruded Polystyrene (XPS) board, which comes in 4' x 8' sheets. It has an R value of 10, and a temperature rating that will allow the kiln to be used as a flue-cure chamber as well. It's pink! It's expensive.
One of the headaches in determining the dimensions of the various wood members of the skeleton is that, unlike every other product on the market, the stated width and thickness dimensions of lumber are usually, though not always, fictional. The length is its actual length. For so called "hobby boards," the other two dimensions may be actual, though sometimes they are not. With construction lumber (most of the wood offered at Home Depot and Lowe's), the width and thickness are pretend dimensions. So you need to carry a small ruler, and measure it if you care.
This dimensional fantasy becomes a problem when you start with a desired external kiln size, say 30" wide by 26" deep. The 2" Foamular XPS board is actually 2" thick, so the frame would need to be 26" wide by 22" deep. (The kiln height is determined solely by board length, so that's predictable.) I planned on 2" x 2" verticals at the corners of the skeleton. I identified "hobby boards" on the Home Depot website that were stated to be actual 2" x 2". I did not measure them at the store. When I got them home, they were actually 1-1/2" x 1-1/2". My wood kiln frame ends up being 1" smaller in width and depth than I had planned. That's not a big deal, but is annoying.
Materials
Tools Required
Building The Skeleton
Because of the specific dimensions of my kiln, I was able to have Home Depot cut each of the 8' wood boards in half, so they would easily fit in my sedan. This results is very little wood wasted. In this discussion, I refer to the nominal dimensions, even though they are bogus.
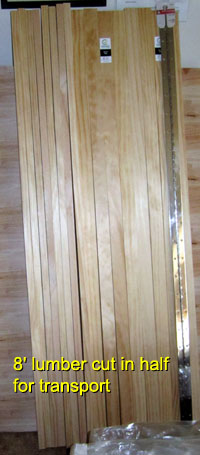
Eight foot lumber, cut in half for transport.
Required wood pieces:
Required XPS foam pieces:


Screws offset at corners. Pilot hole template made from a business card.
Because the verticals are intersected by horizontals on two adjacent surfaces, the two screws for attaching one brace must be offset from the two screws attaching the second brace.
Pre-drilling screw holes
This build consists of a large number of long screws. Although deck screws can often be screwed directly into undrilled wood, it is less work to pre-drill a pilot hole for each screw, and it reduces the chance of splitting the wood.
As Knucklehead reminded me, the first board through which the screw will pass should be bored with a large enough bit for the screw to be pushed through snugly. The second board should be drilled with a bit that is smaller than the diameter of the screw threads. This combination allows the screw to draw the two boards together.
Although a single screw is sufficiently strong for each of the lumber joins, two screws are used for each join, in order to prevent the wood from rotating.
It's easier to pre-drill the screw holes in all the various members prior to starting assembly. After the skeleton is assembled (and now stable), drilling for the shelves and XPS foam attachment can be be done.


Door corner screws. Door knee brace.

Completed door.
The door hinge
Use a hacksaw to cut the piano hinge to a suitable length. For my 44" tall frame, I cut the 48" piano hinge to 39-1/2", in order to avoid the heads of the deck screws at the frame corners.
A piano hinge can be positioned in various orientations. Make sure that your chosen orientation allows the door to open at least 90º, and that the gap remaining between the front frame and the door is appropriate for compressing your chosen door gasket without requiring too much force. The silicone gasket is not only soft, but compresses to a very thin profile. I chose to lay the hinge flat on the exterior, with the hinge joint to the outside, leaving a 1/16" gap between the box frame and the door.
Carefully mark the position of each of the many screw holes for the box side of the hinge, then pre-drill them for the tiny screws that come with the piano hinge. Once the hinge is attached to the box vertical, position the door, mark the screw positions for the door vertical, then pre-drill and attach.


View of hinge.
Latches
I have used three simple, 2" hook and eye latches. These were mounted on the side of the door vertical, and the corresponding side of the box front vertical, with the hooks on the door side and the eyes on the box side.


Latched with three hook and eye closures.
Bob

Endoskeleton. The foam board goes on the outside.
Caveat
The wood-built kiln discussed here has several advantages over using a dead, upright freezer for a kiln, but will require more work to complete, and will certainly cost more.
- it weighs significantly less
- it can be sized to whatever dimensions you decide
- it can be disassembled, if needed, for storage or transport
Level of Difficulty
This kiln is not difficult to build, but is quite tedious, because of the many wood members and segments of XPS foam board. The cuts do not have to be all that precise. My choice of assembling the skeleton using deck screws (so that it can be disassembled, if need be) means a lot of drilling of pilot holes, and the placing of numerous long screws.
In contrast to Knucklehead's wood, home-built kiln, which is an exoskeletal wood frame built around an inner container of extruded polystyrene (XPS) foam board, my approach has been to construct a wood frame, with the XPS foam board on the outside of the wood skeleton. My endoskeletal frame weighs 23 pounds, excluding the shelves, XPS foam and casters. It is sturdy enough to easily support my body weight.
My initial idea was to design a simple, modular framework that could be enlarged by adding additional modules, joined to one another by wingnut bolts. That turned out to be impractical, and a needless complication. It was intended to be a marketable, enlargeable kiln kit that could be purchased.
Instead, I settled on a general design that allows a home-builder to decide on a specific set of dimensions (desired size, available space, etc.), and construct it in a similar fashion, from components readily available at most big-box home improvement stores: standard lumber, common deck screws, and Dow-Corning Foamular extruded polystyrene (XPS) insulation foam board.
If you happen to be skilled at cabinetry, then you may find the detailed commentary a bore. If you've never built anything yourself, the lengthy pointers will hopefully convince you that this really is easy to do--but it will take some time to complete. (Allow a week or two of spare-time work, or a day or two of full-time work for those more experienced.) I'm sure that even a novice will discover ways to make this simpler than what I have done.

Digital controller available on Ebay for about $15.00.
The only exotic component is its digital temperature controller, which is available for about $15 from a US-based vendor on Ebay. I have made an effort to use only simple tools to cut and assemble the kiln. The wiring is straightforward, and setting the controller is simpler than using a cell phone.
On deciding my dimensions, I measured the space available for a kiln. Another consideration is the dimensions (width) of your doorways, if you will need to move the assembled kiln from one room to another. My choice of foam insulation board (2" Foamular XPS foam) is based on its high R value (R=10), and its relatively high temperature stability (~170ºF), since I planned to use it as both a kiln and a flue-curing chamber. For the same reason, I selected a high-temperature, silicone door gasket material. If your intended use is only as a kiln, then you may choose to select less expensive foam, and a less expensive gasket material, though the electric cost increases with poorer insulation and sealing.
For the insulation board, I chose Dow-Corning 2" Foamular Extruded Polystyrene (XPS) board, which comes in 4' x 8' sheets. It has an R value of 10, and a temperature rating that will allow the kiln to be used as a flue-cure chamber as well. It's pink! It's expensive.
One of the headaches in determining the dimensions of the various wood members of the skeleton is that, unlike every other product on the market, the stated width and thickness dimensions of lumber are usually, though not always, fictional. The length is its actual length. For so called "hobby boards," the other two dimensions may be actual, though sometimes they are not. With construction lumber (most of the wood offered at Home Depot and Lowe's), the width and thickness are pretend dimensions. So you need to carry a small ruler, and measure it if you care.
This dimensional fantasy becomes a problem when you start with a desired external kiln size, say 30" wide by 26" deep. The 2" Foamular XPS board is actually 2" thick, so the frame would need to be 26" wide by 22" deep. (The kiln height is determined solely by board length, so that's predictable.) I planned on 2" x 2" verticals at the corners of the skeleton. I identified "hobby boards" on the Home Depot website that were stated to be actual 2" x 2". I did not measure them at the store. When I got them home, they were actually 1-1/2" x 1-1/2". My wood kiln frame ends up being 1" smaller in width and depth than I had planned. That's not a big deal, but is annoying.
Materials
| ITEM | QTY | PRICE | EXT | SOURCE |
| 110v ºF Digital Temp Controller | 1 | $14.99 | $14.99 | http://www.ebay.com/itm/281294885235 |
| wood cigar box for electrical | 1 | free | free | on hand |
| 6' 16/2 Extension Cord | 1 | $1.47 | $1.47 | Home Depot |
| 12' 16/2 Extension Cord | 1 | $2.58 | $2.58 | Home Depot |
| wire twist connectors 12 pk | 1 | $1.97 | $1.97 | Home Depot |
| 1# box 2-1/2" deck screws | 1 | $8.47 | $8.47 | Home Depot |
| 1# box 3" deck screws | 1 | $8.47 | $8.47 | Home Depot |
| 2" hook & eye 3 pk | 1 | $2.24 | $2.24 | Home Depot |
| 1-1/2" x 48" piano hinge | 1 | $10.47 | $10.47 | Home Depot |
| 4' x 16" wire linen shelf | 1 | $8.55 | $8.55 | Home Depot |
| 4-1/2" door pull | 1 | $2.47 | $2.47 | Home Depot |
| 5-3/4" door pull | 1 | $3.57 | $3.57 | Home Depot |
| 1-1/2" swivel caster | 2 | $2.97 | $5.94 | Home Depot |
| 1-1/2" rigid caster | 2 | $2.47 | $4.94 | Home Depot |
| 3/4" screws to fit casters | 16 | free | free | on hand |
| 3/16"x 1-1/4" fender washers | 50 | $0.14 | $7.00 | Home Depot |
| 2" x 165' Tyvek tape | 1 | $12.48 | $12.48 | Home Depot |
| 2" x 2" x 8' pine | 4 | $8.38 | $33.52 | Home Depot |
| 1" x 3" x 8' pine | 4 | $7.95 | $31.80 | Home Depot |
| 2" x 4' x 8' Foamular XPS board | 2 | $35.67 | $71.34 | Home Depot |
| 1/2" x 20' Silicone Door Seal | 1 | $16.73 | $16.73 | www.homedepot.com |
| 1/4" x 30" x 26" plywood | 1 | free | free | Home Depot |
| 2 quart Crockpot | 1 | $7.00 | $7.00 | Walmart |
Tools Required
- Cross-cut saw or miter saw or table saw (or coping saw or pruning saw--just about any saw)
- Phillips screw driver
- power drill or hand drill with various small bits
- hacksaw
- small knife
- eye protection for use with any power tools
- tiny straight screwdriver for wiring digital controller
Building The Skeleton
Because of the specific dimensions of my kiln, I was able to have Home Depot cut each of the 8' wood boards in half, so they would easily fit in my sedan. This results is very little wood wasted. In this discussion, I refer to the nominal dimensions, even though they are bogus.

Eight foot lumber, cut in half for transport.
Required wood pieces:
- verticals--2" x 2" x 44" (6)
- door top and bottom--2" x 2" x 22" (2)
- sides--1" x 3" x 16" (8)
- front and back--1" x 3" x 22 (6)
- knee brace--1" x 3" x 24" (1) cut 45º angles
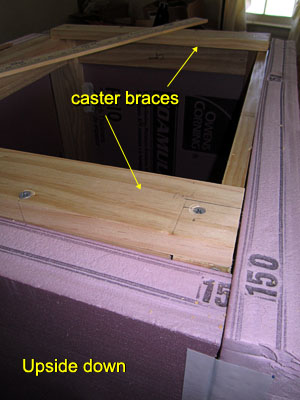
- caster braces--1" x 3" x 19" (2)
- bottom--1/4" x 19" x 23" plywood (1) [measure after bottom XPS foam is fitted]
Required XPS foam pieces:
- door--25" x 44" (1)
- back--29" x 44" (1)
- sides--19" x 44" (2)
- top--29" x 25" (1)
- bottom--25" x 25" (1)
- optional hinge block--3-1/2" x 44" (1)
- optional latch block--3-1/2" x 44" (1)


Screws offset at corners. Pilot hole template made from a business card.
Because the verticals are intersected by horizontals on two adjacent surfaces, the two screws for attaching one brace must be offset from the two screws attaching the second brace.
Pre-drilling screw holes
This build consists of a large number of long screws. Although deck screws can often be screwed directly into undrilled wood, it is less work to pre-drill a pilot hole for each screw, and it reduces the chance of splitting the wood.
As Knucklehead reminded me, the first board through which the screw will pass should be bored with a large enough bit for the screw to be pushed through snugly. The second board should be drilled with a bit that is smaller than the diameter of the screw threads. This combination allows the screw to draw the two boards together.
Although a single screw is sufficiently strong for each of the lumber joins, two screws are used for each join, in order to prevent the wood from rotating.
It's easier to pre-drill the screw holes in all the various members prior to starting assembly. After the skeleton is assembled (and now stable), drilling for the shelves and XPS foam attachment can be be done.


Door corner screws. Door knee brace.

Completed door.
The door hinge
Use a hacksaw to cut the piano hinge to a suitable length. For my 44" tall frame, I cut the 48" piano hinge to 39-1/2", in order to avoid the heads of the deck screws at the frame corners.
A piano hinge can be positioned in various orientations. Make sure that your chosen orientation allows the door to open at least 90º, and that the gap remaining between the front frame and the door is appropriate for compressing your chosen door gasket without requiring too much force. The silicone gasket is not only soft, but compresses to a very thin profile. I chose to lay the hinge flat on the exterior, with the hinge joint to the outside, leaving a 1/16" gap between the box frame and the door.
Carefully mark the position of each of the many screw holes for the box side of the hinge, then pre-drill them for the tiny screws that come with the piano hinge. Once the hinge is attached to the box vertical, position the door, mark the screw positions for the door vertical, then pre-drill and attach.


View of hinge.
Latches
I have used three simple, 2" hook and eye latches. These were mounted on the side of the door vertical, and the corresponding side of the box front vertical, with the hooks on the door side and the eyes on the box side.


Latched with three hook and eye closures.
Bob
Last edited:


