Buy Tobacco Leaf Online | Whole Leaf Tobacco

Deluxestogie's Endoskeletal Wood Tobacco Kiln / Flue-cure chamber

deluxestogie

Administrator
Staff member
Joined
May 25, 2011
Messages
24,008
Points
113
Location
near Blacksburg, VA
When flue curing, do ever need to add water to the crock pot, or are you simply running it dry the whole time? Thanks!
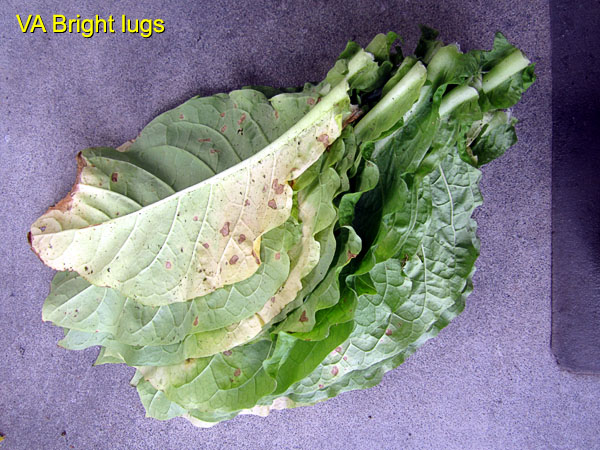
Excellent question. With the Cozy Can, I was afraid that the proximity of the Crockpot to the leaf (in the cramped quarters of a trash can) might dry the leaf during the yellowing phase of flue-curing, so I added enough water at the start, to last at least through the first day of yellowing. Thereafter, I allowed it to run dry. The remainder of the run, all the way to 165ºF, was done using a dry Crockpot.

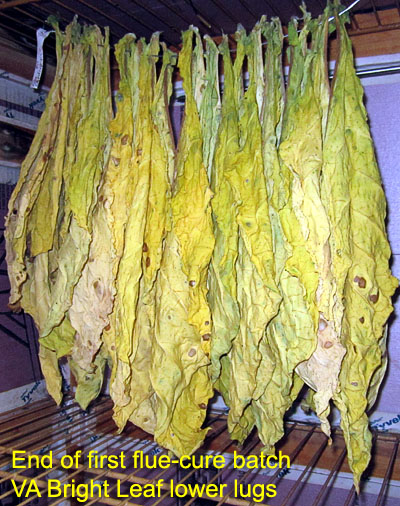
With the endoskeletal kiln, I've never flue-cured in it. Because of the greater size of the container, the greater distance between the Crockpot and the hanging leaf, and the presence of a circulation fan (which was lacking in the Cozy Can), I intend to leave the Crockpot dry throughout the flue-cure runs.

One huge advantage of the endoskeletal kiln over the Cozy Can is that the temperature control in the former is digital, and maintains fairly precise control. Also, the insulation is better.

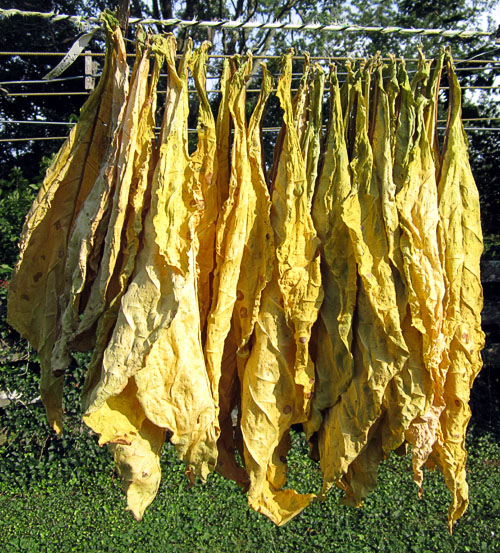
Of course, the whole point of the Cozy Can was to demonstrate just how crude the setup could be, yet still successfully flue-cure bright leaf. In neither the Cozy Can nor the kiln is there a wet-bulb/dry-bulb thermometer. That "wet-bulb temp" on the graph is aspirational for me, but I'll never know.

Bob
 

deluxestogie

Administrator
Staff member
Joined
May 25, 2011
Messages
24,008
Points
113
Location
near Blacksburg, VA
Today, I started my first flue-cure run in the endoskeletal kiln. My goal is to yellow at 100ºF. Unfortunately, the ambient temperature on my back porch (home of the kiln), is 92ºF, which makes it difficult for the kiln temp to equilibrate to the set temp--even with the Crockpot unplugged. The fan is running. At the moment, the kiln door is also cracked open.

The mixed batch of leaf will also present a challenge. With only 8 VA Bright Leaf plants, it's difficult to prime a sufficient number of leaves of the same ripeness. If I wait a few days, the yellowest of these will be past the ideal time.

Garden20170712_2829_VABright_lugs_600.jpg


Some part of each leaf is yellow. Really.

Garden20170712_2830_flueCure_start_600.jpg

About 30 leaves.

I'll snap a photo at the point that I decide to climb the temp from yellowing to leaf wilt. After that, I will await the result of the completed run.

Bob
 

deluxestogie

Administrator
Staff member
Joined
May 25, 2011
Messages
24,008
Points
113
Location
near Blacksburg, VA
How Yellow Is Yellow Enough?

Garden20170714_2834_flueCure_45hours_600.jpg


There has been no dripping or drooling from the kiln during the yellowing phase. The leaf shown above feels entirely dry on the surface, and completely floppy. After 45 hours of yellowing, I've decided to lock down the chamber, and begin the remainder of the flue-cure program--with no further peeking.

Since I have to manually alter the digital controls, I've decided to go in 10ºF increments at 5 hour intervals, to progress into each new phase. (I refuse to set an alarm clock to do exactly 2ºF/hr.)

An interesting discovery during the yellowing is that at chamber temps that are only 10-20ºF above ambient, the heat generated by the fan motor alone is sufficient heat keep it near 100ºF! The 2" Foamular XPS insulation is that good. So, I've had the Crockpot unplugged during most of the yellowing. (I guess I could have figured that out, since the Cozy Can was using a couple of seedling mats to maintain yellowing temps.)

Now, I have plugged the Crockpot into the temp-switched controller, set the Crockpot to Hi, and closed the corner insulation blocks. At the top of each corner is a foam wedge that completes the seal, but I've left these two wedges off for now. I'll probably put them in when I head into stem kill. The temp was set to 110ºF at Noon. Now it will go to 120ºF.

So, how do I know that it's yellow "enough?" I don't, really. But I'm going to trust the ramping into the wilt phase to complete the yellowing.

Bob
 

deluxestogie

Administrator
Staff member
Joined
May 25, 2011
Messages
24,008
Points
113
Location
near Blacksburg, VA
The residual green will fade away (in about 6 hours, if I hang the leaf in sunlight). The yellow is now fixed. The high temp of flue-curing denatures the most active enzyme that causes yellow leaves to age into brown. That's the magic of flue-curing.

The actual leaf appears more lemon and less green than the flash exposure, but there is faint green there. I'll do a bit of sunlight, then repeat the photo.

I'm now starting a fuller batch of VA Bright Leaf (lower to mid ~40 leaves) and some Prancak N-1 (lower ~30 leaves).

Bob
 

deluxestogie

Administrator
Staff member
Joined
May 25, 2011
Messages
24,008
Points
113
Location
near Blacksburg, VA
This is the leaf after 47 seconds of direct sunlight--just long enough for me to go get my camera. So this is the identical string of leaf in sunlight, instead of a camera flash.

Garden20170718_2877_flueCure_end_sunlight_500.jpg


Bob
 

deluxestogie

Administrator
Staff member
Joined
May 25, 2011
Messages
24,008
Points
113
Location
near Blacksburg, VA
Thank you.

My 8 VA Bright Leaf plants, together with my Prancak N-1 should be enough bright leaf for about 2 years (2 winters, actually) of my pipe blending. The endoskeletal kiln has its middle wire shelf removed now, for kilning the big upper lugs of the VA Bright, so with long leaf, there is only a single tier for hanging during flue-curing. Another 15-18" of height in the kiln would allow it to be filled with two tiers, but I just don't use that much bright leaf for it to be an issue for me.

For cigarette smokers, who use a lot more bright leaf than I use, building a kiln/flue-cure chamber tall enough for 2 tiers of large leaf might be a design consideration.

But, I am pleased that my kiln works well as a flue-cure chamber, and without any specific vent having to be cut into it. By the way, the Foamular XPS foam walls, the Tyvek tape, the wood structure, and even the plastic (cut from a mushroom box from the supermarket) air diverter on the fan...everything seems to tolerate the flue-cure temps without difficulty. The only caution is to make sure the electric cords for the Crockpot and the fan are kept away from touching the sides and ceramic of the Crockpot.

So, with the materials used for the endoskeletal kiln, you can definitely have a kiln and a flue-cure chamber. Despite the title of this thread, I wasn't 100% certain about the flue-cure part until now.

Bob
 

deluxestogie

Administrator
Staff member
Joined
May 25, 2011
Messages
24,008
Points
113
Location
near Blacksburg, VA
Kiln Fan Lifespan

It was a fortunate event last night. I was out on my enclosed back porch--home of my Endoskeletal Kiln--when I heard the kiln's fan motor momentarily stop, then start again, as though there had been a brief power outage. But the lights had not flickered.

The kiln fan (an inexpensive, bathroom vent fan) is regulated with a fan dimmer switch. I switched this off, then switched it on again. Nothing happened. The fan would not restart. I unplugged the fan from the dimmer, and plugged it directly into an unswitched outlet--nothing. So, the fan had actually died in my presence.

When a fan motor stops turning, the motor wrappings begin to heat up, and may eventually burn the house down.

Today, I traveled to Lowe's Home Improvement to purchase a replacement motor. The whole fan assembly cost about $15. Just the replacement motor alone was selling there for $18. Go figure. So I bought another entire bathroom ventilation fan for the $15 price. [50 cfm. The kiln is about 13 cubic feet, so a 50 cfm fan is circulating all the air in the kiln nearly 4 times per minute.]

Inside the kiln, the fan assembly is hung from two aluminum wires. I was able to sever its power cord, and re-use the same cord for the new fan, after a couple of splices. I created a new fan outlet diverter (to send the air blowing upward, instead of directly at the inside of the door) from a clean, plastic mushroom carton. This was all pretty simple, and did not interrupt the present kiln run (by, say, burning the house down).

The original fan lasted 2 years and 4 months, running non-stop the entire time. I suspect that the 5 or so weeks of flue-curing (intermittently up to 170ºF) cooked away the "permanent lubrication" of the motor bearings. It had been subsequently running in kiln mode for the past two weeks.

Bob
 

JLP

Member
Joined
Mar 9, 2016
Messages
23
Points
0
Location
Edinburgh, Scotland
Awesome thread Bob!,
Thanks for sharing this, it's exactly what I was looking for at the moment.

Good to hear that the croc pot produce enough heat to maintain fermentation temps too, I had thought about a heat pad of some description but already have a croc pot so maybe I can just use that too.

I have the fridge I think I mentioned to you and had thought to use this controller here I found on Amazon, no wiring :rolleyes: .... it will do the job right?

Andy
 

deluxestogie

Administrator
Staff member
Joined
May 25, 2011
Messages
24,008
Points
113
Location
near Blacksburg, VA
The controller that you link to is one with which I am not familiar. And there is nearly no info there on the listing. Does it use a remote sensor, or must the controller be placed inside the kiln? Is 220 volts what you need?

The wiring of the controller that I use (and any similar controllers) is really easy.

Bob
 

mwaller

Well-Known Member
Joined
Sep 11, 2016
Messages
618
Points
28
Location
Kirkland, WA
Awesome thread Bob!,
Thanks for sharing this, it's exactly what I was looking for at the moment.

Good to hear that the croc pot produce enough heat to maintain fermentation temps too, I had thought about a heat pad of some description but already have a croc pot so maybe I can just use that too.

I have the fridge I think I mentioned to you and had thought to use this controller here I found on Amazon, no wiring :rolleyes: .... it will do the job right?

Andy

I just built my kiln with an Inkbird controller like that - works great!
 

JLP

Member
Joined
Mar 9, 2016
Messages
23
Points
0
Location
Edinburgh, Scotland
Thank you guys,
Yes 240v mains over here in blighty......there isn't a whole lot of info on it no, at first glance I thought it had two output sockets as you fitted on your's Bob but one is for a 'cooler' appliance.

I just ordered it so I'll let you know it goes, I appreciate the advice :cool:

Sorry, edit just to mention it does have a remote temp sensor on it yes, it's a NTC sensor (I don't know what that is?) on a 6ft lead.

Andy
 

Jitterbugdude

Moderator
Founding Member
Joined
May 22, 2011
Messages
4,266
Points
113
Location
Northeast Maryland
Sorry, edit just to mention it does have a remote temp sensor on it yes, it's a NTC sensor (I don't know what that is?) on a 6ft lead.

An NTC sensor is just a fancy way of saying it is a thermistor. A thermistor is basically a resistor that is very sensitive to temperature changes.
 

DistillingJim

Well-Known Member
Joined
May 23, 2016
Messages
357
Points
28
Location
UK
JLP - I use an inkbird (I think I bought it on UK amazon) without issue here so it should be fine for you too
 

JLP

Member
Joined
Mar 9, 2016
Messages
23
Points
0
Location
Edinburgh, Scotland
An NTC sensor is just a fancy way of saying it is a thermistor. A thermistor is basically a resistor that is very sensitive to temperature changes.

Thanks Jitterbugdude, I have to concede defeat when it comes to electronic components, was very interested in my younger years playing with short-wave radio etc but didn't keep it up as a hobby unfortunately. I knew it was the temperature probe but that's all :confused:,

Is that temp controller you have in your kiln an Inkbird 'type' Bob?, I saw Inkbird ones just like it when ordering mine...

Andy
 

deluxestogie

Administrator
Staff member
Joined
May 25, 2011
Messages
24,008
Points
113
Location
near Blacksburg, VA
Mine is not branded. The exact model (from several years ago) is no longer available, but is similar to this one: http://www.ebay.com/itm/10A-110V-Di...sor-Thermostat-Control-Relay-US-/141731449329

My line voltage is not 220, but rather 110v. My original controller failed after 2-1/2 years (if I remember correctly), so I purchased two more of the same thing, and currently have the spare waiting for any future fail.

Unlike the Inkbird device, the one that I use needs to be mounted within some sort of box. I used a whittled hole in a cigar box for this.

Bob
 
Top