AmaxB
Well-Known Member
Making a Dry / Wet Bulb Set-Up
Dry Bulb / Wet Bulb thermometers can be used to get the Relative Humidity of an inclosed environment, such as that of a Kiln, Curing Chamber, Shed, etc., and so on. The Dry Bulb / Wet Bulb Thermometers can help to ensure the outcome of your Tobacco by allowing you to monitor the Relative Humidity.
Below I attempt to show you how to make one that I have checked against a PID Relative Humidity Controller and found to be accurate.
What you need to make one:
Two Thermometers
Tube type boot / tennis shoe lace
Solid type tennis shoe lace
Wire Ties – Zip Type
Wire Bread Tie
1/2 Inch Wire Screen
A Glass Bottle w Cap able to stand up to 200F
Water
Most of these items you likely have already just laying around
For your Thermometers I would recommend 2 of these your cost for them about $14.00 including shipping found them on E-Bay here http://www.ebay.com/itm/120712641637?ssPageName=STRK:MEWNX:IT&_trksid=p3984.m1439.l2649
Step 1
Cut a piece of wire screen large enough to fold all 4 sides twice and still accommodate your bottle and thermometers. I would suggest laying the thermometers and bottle on your screen before cutting to get the size you need keeping in mind you are going to fold the sides over. You want to fold the sides to make the screen more ridged.
While you have your thermometers laying on the screen mark the location of the bulb for the thermometer you plan to use as wet it should be near the bottle opening.
Step 2
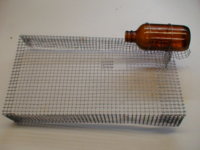
Fold all for sides of your screen and attach your bottle without the cap. To attach my bottle I used Aluminum wire. Than cut out a section of screen where the bulb of your Wet Bulb Thermometer will be located. Cut it out large enough so no screen will come in contact with the thermometer bulb or boot lace when it is in place.
You should have something that looks like this.
.
 -
-
.
Step 3
Cut the tube type Boot / Tennis Shoe Lace to 11 inches long and cut the solid type Boot / Tennis Shoe Lace to 12 inches long.
Step 4
Threading the Laces
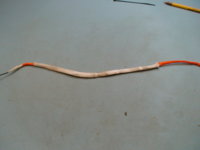
Attach one end of the Solid Lace to a piece of wire using tape. Bend the other end of the wire so it can't snag and push it through the tubular lace. With a little care using the wire and working the tubular lace pull the solid lace through the tubular one until it is all the way through.
.
 -
-
.
Step 5
Cut the guard section protecting the bulb of the thermometer you plan on using as wet away.
Than pulling the solid lace enough to have it just inside an end of the tubular lace so it can touch the bulb of your wet bulb thermometer. Slip this end of the tubular lace over the bulb of the thermometer you are going to use as wet and fasten with the wire bread tie.
.

.
Step 6
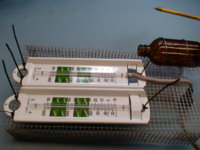
Attach your thermometers to the wire screen backing using the wire zip ties. The bulb of the thermometer you plan to use as wet should be over the hole you cut in the screen for it. It should not touch the screen nor should the tubular Boot / Tennis Shoe Lace.
.
 -
-
.
Step 7
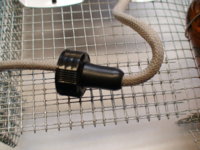
Make a hole in your bottle cap, make it large enough to get the Boot / Tennis Shoe Lace through so it is slightly snug but not tight at all. My bottle cap has a rubber nipple on it yours does not need to be like mine.
.
.
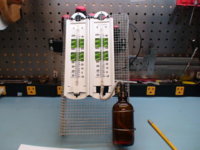
All done this is what you should look like. Last thing you should have close to 5 inches of Lace between the bottle cap and bulb of the wet bulb thermometer.
.
.
Now fill the Bottle with water, holding the lace screw the cap on. Good luck with your Tobacco
You can use this calculator to get your Relative Humidity by inputting the Dry Bulb Thermometer and We Bulb Thermometer temperatures. http://home.fuse.net/clymer/water/wet.html
Dry Bulb / Wet Bulb thermometers can be used to get the Relative Humidity of an inclosed environment, such as that of a Kiln, Curing Chamber, Shed, etc., and so on. The Dry Bulb / Wet Bulb Thermometers can help to ensure the outcome of your Tobacco by allowing you to monitor the Relative Humidity.
Below I attempt to show you how to make one that I have checked against a PID Relative Humidity Controller and found to be accurate.
What you need to make one:
Two Thermometers
Tube type boot / tennis shoe lace
Solid type tennis shoe lace
Wire Ties – Zip Type
Wire Bread Tie
1/2 Inch Wire Screen
A Glass Bottle w Cap able to stand up to 200F
Water
Most of these items you likely have already just laying around
For your Thermometers I would recommend 2 of these your cost for them about $14.00 including shipping found them on E-Bay here http://www.ebay.com/itm/120712641637?ssPageName=STRK:MEWNX:IT&_trksid=p3984.m1439.l2649
Step 1
Cut a piece of wire screen large enough to fold all 4 sides twice and still accommodate your bottle and thermometers. I would suggest laying the thermometers and bottle on your screen before cutting to get the size you need keeping in mind you are going to fold the sides over. You want to fold the sides to make the screen more ridged.
While you have your thermometers laying on the screen mark the location of the bulb for the thermometer you plan to use as wet it should be near the bottle opening.
Step 2
Fold all for sides of your screen and attach your bottle without the cap. To attach my bottle I used Aluminum wire. Than cut out a section of screen where the bulb of your Wet Bulb Thermometer will be located. Cut it out large enough so no screen will come in contact with the thermometer bulb or boot lace when it is in place.
You should have something that looks like this.
.
 -
-
.
Step 3
Cut the tube type Boot / Tennis Shoe Lace to 11 inches long and cut the solid type Boot / Tennis Shoe Lace to 12 inches long.
Step 4
Threading the Laces
Attach one end of the Solid Lace to a piece of wire using tape. Bend the other end of the wire so it can't snag and push it through the tubular lace. With a little care using the wire and working the tubular lace pull the solid lace through the tubular one until it is all the way through.
.
 -
-
.
Step 5
Cut the guard section protecting the bulb of the thermometer you plan on using as wet away.
Than pulling the solid lace enough to have it just inside an end of the tubular lace so it can touch the bulb of your wet bulb thermometer. Slip this end of the tubular lace over the bulb of the thermometer you are going to use as wet and fasten with the wire bread tie.
.

.
Step 6
Attach your thermometers to the wire screen backing using the wire zip ties. The bulb of the thermometer you plan to use as wet should be over the hole you cut in the screen for it. It should not touch the screen nor should the tubular Boot / Tennis Shoe Lace.
.
 -
-
.
Step 7
Make a hole in your bottle cap, make it large enough to get the Boot / Tennis Shoe Lace through so it is slightly snug but not tight at all. My bottle cap has a rubber nipple on it yours does not need to be like mine.
.

.
All done this is what you should look like. Last thing you should have close to 5 inches of Lace between the bottle cap and bulb of the wet bulb thermometer.
.

.
Now fill the Bottle with water, holding the lace screw the cap on. Good luck with your Tobacco
You can use this calculator to get your Relative Humidity by inputting the Dry Bulb Thermometer and We Bulb Thermometer temperatures. http://home.fuse.net/clymer/water/wet.html


