Buy Tobacco Leaf Online | Whole Leaf Tobacco

JennyLeez Grow Log 2018

Status
Not open for further replies.

JennyLeez

Well-Known Member
Joined
Mar 2, 2018
Messages
126
Points
43
Location
Hawkes Bay, New Zealand
Chapters 1 to 6 – September 2017 to March 2018.

I had no idea what I was doing, how to do it, when to do it but I did know why I needed to do it.
I have started my log from when I first planted back in September (our Spring) as where I am up to now is a continuation of this.

Chapter 1 – Germination/Transplanting

The powers that be in my country decided in their idiotic wisdom to make New Zealand smokefree come 2025. Speaking with those around me, we could not actually see this eventuating. It would have killed our tourism industry for a start. Nonetheless this sent many of us scurrying for alternatives.

After I was given a small bag of Burley/Virginia Gold seeds at the end of September I sprinkled a few and covered them in a seed grower tray full of Potting Mix. I put them out on my decking under clear nova roofing. Germination was quick as by then the weather was warm and sunny. At that stage I was thinking I would grow 12 plants as lack of room in garden and shed for hanging. I also had no idea whether I was going to like the taste or not and of course I had no idea what I was doing.

potting_mix.jpg

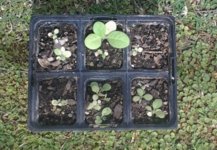
For the next 3 weeks they did nothing. They just sat there green and healthy but absolutely no growth whatsoever. I sunned them, I watered them, I thinned them out, I even talked to them. Nothing.

I looked at my veggie plants all growing profusely most of which had been planted out. Ok, so what was the difference? It then dawned on me, ah ha, the Soil.
I filled an empty punnet with soil from our well composted garden and moved a few plants out of the potting mix into this punnet. Within a few days these plants began to grow so I moved more tiny plants, enough to fill a few punnets and they too started to grow. They obviously did not like the potting mix. Annoying though, I had lost 3 to 4 weeks growth so I was not happy. I will not be using potting mix again that is for sure.

Once they had outgrown their punnets I moved them into larger plant containers. I wanted them well established before transplanting into the garden which by now was gaining the full force of the late Spring Sun.

-The tiny plants in the potting mix remain green and healthy and continued not to grow.

I continued every 3 to 4 weeks, transplanting a dozen into punnets with garden soil and then when big enough into larger containers. I gave away many as friends became interested in my new hobby. Once plants were strong enough I planted out the first dozen and I was away. By then I had a lot of plants in pots with groups at different growth stages. In my ignorant mind I was going to do the same as I do with my veggies. Plant, grow, eat and replant. I had not realized these tobacco plants would be in the garden for so long nor did I realize how big they were going to grow :)

Meanwhile:
-The tiny plants in the potting mix remain green and healthy and continued not to grow.

These tiny plants sat in potting mix for going on 6 months. How weird is this. They just remained the same as the top picture taken 6 months ago except their numbers decreased as I moved them out into garden soil a few at a time. *Shrug* I have moved the last of them last weekend.

And so ends Chapter 1.

To be Continued.
 

greenmonster714

Well-Known Member
Joined
Sep 10, 2016
Messages
1,351
Points
63
Location
West Central Alabama
Tobacco is very slow in the beginning but these little ones seem to be on strike. I can't I'm age why the would progress and get on with life. I have no answer but I'm hoping someone will pipe in with some for ya.
 

mwaller

Well-Known Member
Joined
Sep 11, 2016
Messages
618
Points
28
Location
Kirkland, WA
In my limited experience, the seedlings are particularly sensitive to coarse and/or compacted soil. They seem to thrive in very finely milled starting mix.
See if you can find a very finely textured seed starting mix. Here in the US, Jiffy is a good one.
Fill your pots loosely so the roots have an easy time growing, and water from below.
 

deluxestogie

Administrator
Staff member
Joined
May 25, 2011
Messages
24,013
Points
113
Location
near Blacksburg, VA
Crowding. If tiny seedlings are left crowded with fellow seedlings, they just won't grow much at all. I've had my small germination cups crowded with leftover seedlings for months. (Several years ago, I maintained two germination cups--two different strains--in their miniature state for over 9 months.) They just stay that way, so long as you water them. Move them out of the ghetto, and they explode.

The same sort of effect can be demonstrated in the garden if you replace a failed transplant with a healthy one, but the new one is significantly behind its new neighbors in growth. The roots of the newbie can't compete with those of its larger neighbors.

Bob

EDIT: Some 1 year old plants left in undersize containers:

Garden20130527_648_YearOldTobaccoPlants_500.jpg


They just grow to the available root space.
 

Levi Gross

Well-Known Member
Joined
Mar 31, 2016
Messages
678
Points
93
Location
Central, Indiana. USA.
This is very interesting. I wish that some of mine would have stalled out and went on strike, giving me a chance to transplant. All of mine came up thick and fast becoming unmanageable terrorist.
Chapters 1 to 6 – September 2017 to March 2018.

I had no idea what I was doing, how to do it, when to do it but I did know why I needed to do it.
I have started my log from when I first planted back in September (our Spring) as where I am up to now is a continuation of this.

Chapter 1 – Germination/Transplanting

The powers that be in my country decided in their idiotic wisdom to make New Zealand smokefree come 2025. Speaking with those around me, we could not actually see this eventuating. It would have killed our tourism industry for a start. Nonetheless this sent many of us scurrying for alternatives.

After I was given a small bag of Burley/Virginia Gold seeds at the end of September I sprinkled a few and covered them in a seed grower tray full of Potting Mix. I put them out on my decking under clear nova roofing. Germination was quick as by then the weather was warm and sunny. At that stage I was thinking I would grow 12 plants as lack of room in garden and shed for hanging. I also had no idea whether I was going to like the taste or not and of course I had no idea what I was doing.

View attachment 23220

For the next 3 weeks they did nothing. They just sat there green and healthy but absolutely no growth whatsoever. I sunned them, I watered them, I thinned them out, I even talked to them. Nothing.

I looked at my veggie plants all growing profusely most of which had been planted out. Ok, so what was the difference? It then dawned on me, ah ha, the Soil.
I filled an empty punnet with soil from our well composted garden and moved a few plants out of the potting mix into this punnet. Within a few days these plants began to grow so I moved more tiny plants, enough to fill a few punnets and they too started to grow. They obviously did not like the potting mix. Annoying though, I had lost 3 to 4 weeks growth so I was not happy. I will not be using potting mix again that is for sure.

Once they had outgrown their punnets I moved them into larger plant containers. I wanted them well established before transplanting into the garden which by now was gaining the full force of the late Spring Sun.

-The tiny plants in the potting mix remain green and healthy and continued not to grow.

I continued every 3 to 4 weeks, transplanting a dozen into punnets with garden soil and then when big enough into larger containers. I gave away many as friends became interested in my new hobby. Once plants were strong enough I planted out the first dozen and I was away. By then I had a lot of plants in pots with groups at different growth stages. In my ignorant mind I was going to do the same as I do with my veggies. Plant, grow, eat and replant. I had not realized these tobacco plants would be in the garden for so long nor did I realize how big they were going to grow :)

Meanwhile:
-The tiny plants in the potting mix remain green and healthy and continued not to grow.

These tiny plants sat in potting mix for going on 6 months. How weird is this. They just remained the same as the top picture taken 6 months ago except their numbers decreased as I moved them out into garden soil a few at a time. *Shrug* I have moved the last of them last weekend.

And so ends Chapter 1.

To be Continued.
 

Orson Carte

Well-Known Member
Joined
Apr 7, 2016
Messages
246
Points
28
Location
New Zealand
To be perfectly honest, I think I fall into the 'Learner Grower' category - and I'm really not sure just how long this apprenticeship lasts.
However, a few things mentioned in your 'Log' really intrigued me;
The first one was your seed source. You described it as a small 'bag' of Virginia/Burley. Am I to understand that there was a mixture of seeds in the bag? Or is it that the seeds where a cross of VG and Burley? Or, were they separated somehow?
As I've already declared, I am but an apprentice, but if the latter is the case this is possibly part of the problem - in that I've been led to understand that with a genetic mixing of varieties you really can't predict just what you're going to get.
The next aspect is that you've sowed it on 'potting mix'.
From what I know about potting mix in New Zealand it could contain just about anything under the sun - but very likely, in most cases it's often principally compost, sourced from dumped greenwaste. It is usually relatively cheap but not an ideal medium for seed-raising because potentially it carries unknown (or undeclared) 'nasties'. Plenty of good, dedicated 'seed raising' mixtures are available.
I do find it incredible that the seeds you sowed in your tray on Sept 1 still look like they do more than six months later. I also sowed on Sept 1, pricked-out into small pots (like those black ones pictured by Bob, above) about four weeks later, and planted into the open ground on Nov 1 (when they were the size of the largest black-potted ones, above).
I only say this because we both essentially share the same seasons and climate. It is intriguing to conjecture just what kept your seedlings so stunted, yet alive, after more than six months in the ground.
The seed that I sowed on Sept 1, and planted out Nov 1 has now gone through it's whole life and was all flue-cured by February.
I do understand, however, that deprived of ideal conditions some strange things can happen.
Below I've a couple of pics of my VGold that I (through lethargy) left in my cold frame in small starter pots. Somehow, without any attention at all they have rooted through the bottom of the pots and developed, after six months, leaves that, if I was desperate, are almost harvestable.

Wild Ones 001.jpg Wild Ones 002.jpg
 

JennyLeez

Well-Known Member
Joined
Mar 2, 2018
Messages
126
Points
43
Location
Hawkes Bay, New Zealand
Hi,
My initial bag was a mixture of burley and Virginia Gold seeds. It was fairly obviously after transplanting which was which though as the burley grew quicker.
Once I have my own seeds, I will know what I am planting.

Yes watering from below is the way to go. Mine seem to flourish better in the Summer heat if left sitting in water although I prefer to dry them out and drown them again. They soon let you know when dry.

Orson you are completely correct re these crazy plants. They just sat for six months with no growth but staying alive and healthy. No one around here has an answer either. As suggested above, with the potting mix being so coarse this has possibly stopped growth. But from there I would expect them to die off having given up surely?

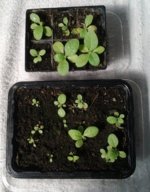
As at last week, below is the last punnet of a few plants still in the potting mix.

last_of_the_first.jpg

I moved them to garden soil and a week later they look as below today.

june_2018_plants.jpg
Lol Levi, yes I have been following your ‘unmanageable terrorist’ thread. Being use to planting veggie seeds I did not overkill the initial planting. I don’t need to. Growing seeds is easy here.

They just grow to the available root space’. And thank goodness for that otherwise I would have had to dig up a lot more lawn.

Cheers
Jenny
 

deluxestogie

Administrator
Staff member
Joined
May 25, 2011
Messages
24,013
Points
113
Location
near Blacksburg, VA
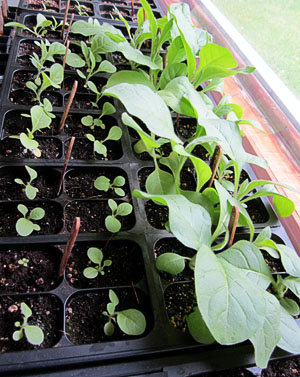
Regarding the effect of soil mix on growth, in the photo below, the rows of cells with midget plants are filled with Jiffy "Organic" seedling coir as the main ingredient, whereas the adjacent rows, with the much more robust plants, are filled with a blend using MiracleGro peat as the primary constituent. Both were supplemented with pearlite and vermiculite.

Garden20120417_129_TrayA1_5wks_300.jpg

From 2012.

Their orientation to the window was rotated every few days.

Bob
 

JennyLeez

Well-Known Member
Joined
Mar 2, 2018
Messages
126
Points
43
Location
Hawkes Bay, New Zealand
Chapter 2 – Growing (December/January)

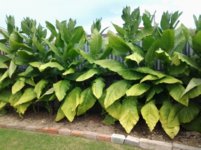
I planted out the first 12 plants along a fence line that receives the full sun most of the day. They grew quickly and fell over :(
So I planted stakes and tied them up. Now when I plant them I whack a stakes into the ground at the same time. Thankfully I have friends with mega bamboo on their property.

Needless to say I ended up with a lot of plants at varies stages in pots. I needed more garden space.

Reading through members grow logs I envied those with big paddocks. My back yard is big enough so down the far end I trudged with spade and started digging up the lawn. I dug 1 row which I planted 10 plants in. I dug a second row and third and fourth, planting out as my re potted plants had grown big enough.

By then it was Summer and I constantly had the sprinkler system on pouring water over them.

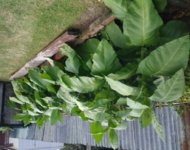
My first side plot was doing well.

grew1.jpg

And continued to do so.

grew2.jpg


grew3.jpg

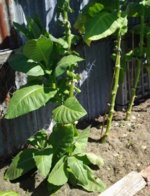
The highest of these plants is now 8ft 6inches / 262cm. I am 5ft 2 inches / 158cm. Removing the suckers/flower buds necessitates a ladder.
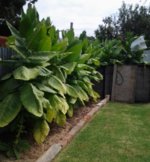
Meanwhile my newly dug plot was doing well also. I see now the plants are ways to close together and I will rectify this when I re plant later this year. I am also guessing I will be adding more rows.

secondplot1.jpg

secondplot2.jpg

I was watering all every second day and waiting patiently for the leaves to turn yellow. From all my reading this is preferable compared to picking green especially when one does not have a kiln. This yellowing sure took a long time.


End of Chapter 2.
 

JennyLeez

Well-Known Member
Joined
Mar 2, 2018
Messages
126
Points
43
Location
Hawkes Bay, New Zealand
Priming, Curing and Hanging – The small Backyard Newbie’s Way.

The bottom leaves on my first crop finally started to yellow up enough for me to pick. I had read I should wash them, dry them and wrap them up in towels to complete the curing stage.

So I washed them. I was not sure how to dry them so I did this.

drying.jpg

This was not satisfactory as I could not get to the coffee machine :D

Another suggestion was to brush them clean and I have opted to do this since.
Wrapping them up in towels sort of worked, but they appeared to be heading to rotting as opposed to yellowing. Meanwhile I was still doing a lot of reading in here. Another suggestion was a box and this is working very well. I acquired a large long low box. It is large enough that I can have 2 leaves per layer and 1 layer for the odd large burley leaf. In between each layer I am using newspaper to soak up the moisture. I reshuffle and change the newspaper each day. (I now have 2 large boxes)

big_box.jpg

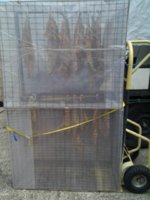
My next dilemma was where to put them to complete the curing stage so they looked golden brown before air hanging and drying. Again advice from this forum gave me my idea. I purchased very thick poly plastic and wrapped up an old rabbit hutch I had. I turned it upright on its side covering the door separately for easy access. I added a temperature/humidity gauge plus wet paper bricks I make during Summer for the winter fire. Not only are these bricks drying inside the cage but they also serve as a moisture/humidity source for the leaves. I only allow the morning sun on the kiln. For the rest of the day it sits in the shade in the hot shed. How is my curing kiln. Pretty cool huh :)

cage.jpg

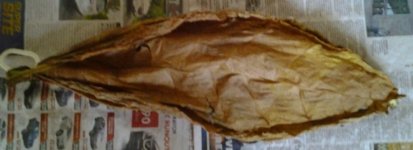
This is what they look like when I take them out of the cool kiln. You may laugh, but it works. This is one of the smaller experimental leaves.

out_of_kiln.jpg

The green and yellow completely disappear and I am left with a brown leaf.
Below is a pic of my paper bricks so you know what I am talking about. They are on a drying rack tied to a wheelbarrow so I can put them undercover at night. At the back is our BBQ. Take all the racks out and it also makes a good drying rack :)


paper_bricks.jpg

Anyway back on topic I have two rows of rope going from one end of the shed to the other with my first priming now hanging. Take a look at these hooks. They are shower hooks using rubber bands so I may tighten them as they shrink. Now that’s very inventive huh :) I can move them along the rope as I hang the new in front of the window.

shower_hooks.jpg

Obviously this is a much longer process than the kilns some of you have made and from reading relevant kiln topics I can quite see I am going to have to become far more inventive. Maybe on my next trip to the Recycle centre I will ask they save an old fridge for me :)

End Chapter 3.
 

Garlisk

Active Member
Joined
Mar 17, 2018
Messages
41
Points
8
Location
Berks County, PA, USA
I am following this thread with great interest. Awesome to see you just diving right in even if the setup isn't perfect, making mistakes, and learning from the effort. Hopefully I'll be doing the same this year as I start my first grow.
 

deluxestogie

Administrator
Staff member
Joined
May 25, 2011
Messages
24,013
Points
113
Location
near Blacksburg, VA
You possess the true spirit of a home tobacco grower. Tradition is encrusted with a lot of silliness, so I am always searching for the absolute minimum, simplest techniques that get the job done. Bravo!

Bob
 

JennyLeez

Well-Known Member
Joined
Mar 2, 2018
Messages
126
Points
43
Location
Hawkes Bay, New Zealand
Chapter 4 - Weather Station/Temperature & Humidity Control


Back in early January when I had all this ‘new hobby enthusiasm’ I was backwards and forwards to the shed checking the temperature and humidity. Opening/closing doors/windows as required. I had hung a towel draped in a bucket of water from the shed rafter to increase the humidity as I had read on the forum. That worked during the weeks when our temperature sat between 30C – 32C (86F – 90F). I was also layering the bottom of the kiln with wet paper bricks.

To make monitoring easier I built a weather sensor out of spare parts, placed it in an umbrella stand and stood it on the shed bench as below with a spare console.


ws_sensor.jpg

Another spare console sits beside me on my workshop desk so the multi trips to the shed have decreased.
However the trips to my workshop increased :(

So I have plugged the console into a 12 inch laptop to allow me to upload a few html pages to my server every 10 minute. This way I can monitor the shed from any device through the internet anywhere on earth :)

ws_console.jpg

Now this is a little different surely :)


End of Chapter 4
 

JennyLeez

Well-Known Member
Joined
Mar 2, 2018
Messages
126
Points
43
Location
Hawkes Bay, New Zealand
Chapter 5 - Grinding, Rolling and Smoking.

From reading I know I need to leave these leaves hanging for 3 to 6 months but I am woman, I am far too impatient for that. I wanted to test what I had. What was worrying me the most was I may not like the taste. It may be too strong as I smoke mild brands. Also I had heard from other locals who have grown their own that they were unable to inhale. I know now the latter was probably because it was too green/wet.

Anyway, ‘curiosity killed the cat’. Back mid February following advice from here once again I purchased a small grinder which works brilliantly.

Unfortunately at this point I ran into a very huge issue - I could not roll the tobacco. I have smoked tailor mades (factory made) all my life hence paper, filter and tobacco just would not go together. I just kept acquiring a mouth full of tobacco with the filter and paper falling apart.

So next I bought a little machine to roll the tobacco and wrap the paper around it. I thought this new hobby of mine was meant to save money. I seem to be buying a lot of equipment….lol


rolly.jpg

Finally after 4 to 5 months growing I was able to hold a newly rolled cigarette up and say out loud with a big smile on my face :) – This is $1.12c or US 0.81c

Once I was over the initial shock of saving my first $1.00 and had smoked a few more, I decided these were much stronger than my tailor mades.
So back to the forum I searched as to how I could mellow them down without altering the flavour drastically. [FONT=&amp]One of our members[/FONT] gave me an easy idea using honey and lemon juice, ingredients I had.

http://fairtradetobacco.com/threads/7654-Homemade-VFC-quot-casing-quot

What he forgot to tell me was I needed to cover the tray with some sort of net food cover when I put the tobacco out to dry. I had put the tray outside under the decking’s nova roofing and from there probably went out back to dig up more lawn.
When I returned in an hour I had Bees flying around everywhere :D

End of Chapter 5
 

MarcL

Well-Known Member
Joined
Mar 11, 2013
Messages
4,413
Points
113
Location
Central Maryland
What I'll say is that to make a lighter smoking experience a little pin hole in the filter area can give a higher air to smoke ratio. which is the difference in commercial regular and light smokes. having to manually adjust while on the draw consciously is not common.
 

Charly

Moderator
Joined
May 1, 2016
Messages
2,209
Points
113
Location
France
Very professional setup ! Congratulations :D

I love the way everyone of us build it's own garden/shed/kiln ! Every one is different. Good job ;)
 

JennyLeez

Well-Known Member
Joined
Mar 2, 2018
Messages
126
Points
43
Location
Hawkes Bay, New Zealand
Chapter 6 – Suckers, Buds & Seeds

Again reading other member’s grow logs I learnt I had to remove all suckers. This was fine, I was already doing that with 30 odd tomato plants. What is a few more tobacco plants added to the mix.

Except the tobacco suckers ran rampart by the middle of Summer. I no sooner removed them and they grew back. The buds/flowers are the same. I remove, they grow back. I watched a few youtube clips of topping machinery at work. Amazing machines but they also removed a lot of leaves so I decided not to buy one of those :)

Now removing suckers and buds were fine until these plants out grew me. First I used a chair and now I am using a ladder to reach the tops. These burley plants sure grew. I am pruning off these suckers every second day. I decided to leave one plant with suckers growing from the base to see what they look like and also experiment with the yellowing.

suckers.jpg

So far the couple I have done did not really go yellow, they just turned brown. I have decided once I have stripped all the leaves off the top of this 1 plant, I will chop it back to these suckers and wait for them to yellow on the plant. I know from advice already given to me on the forum, these leaves will not be of the same standard/quality/size but I will play.

Do these plants actually stop growing at the top? Do all the leaves eventually go yellow? I still have around 1 third of green leaves at the top plus these trees are now 9 feet tall!!!!

To catch the seeds, I purchased a few washing bags to tie around 3 of the flowers to catch the seeds. These bags are made of net and have a zip opening. Very easy to pull over the top of the trees (plants) and then zip up. Right now the bags are just full of lots of flowers.

Meanwhile back in the shed I had removed my 2[SUP]nd[/SUP] priming from the cool kiln and hung it. I had then filled it back up with my 3[SUP]rd[/SUP] priming after a week in my 2 boxes.

End of Chapter 6
Chapter 7 to follow.
 

alPol05

Well-Known Member
Joined
Feb 1, 2018
Messages
140
Points
18
Location
Albuquerque, NM
I like reading your log. There is always an interesting story about you and your very personal experience.

Wiktor
 
Status
Not open for further replies.
Top