Buy Tobacco Leaf Online | Whole Leaf Tobacco

My first roll (advice welcome): @HKRolling

HKRolling

Active Member
Joined
Mar 10, 2023
Messages
28
Points
13
Location
Hong Kong
I'm using the melodioso Cremosa kit from WLT.
I thought I'd share some pics of my first roll.
I have watched a few rolling vids before, but I didn't watch any right before I rolled as I was eager to get rolling and had limited time. So probably did something a bit wrong.DSC_1817.JPG
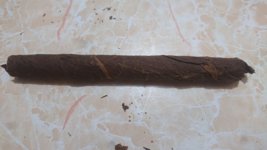
This is with the binder on.


DSC_1819.JPG
With the wrapper.

DSC_1822.JPG
I wrapped it in paper to shape and dry it
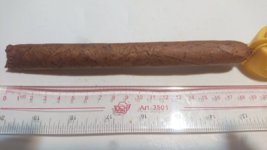
DSC_1825.JPG
After removing the paper.

I didn't really cut much off from the cap end. In hindsight, I probably should have. Even though the bit that is cut off can be rolled into other cigars, there's something that feels wasteful about cutting chunks off. I'm wondering now whether it's needed to allow proper air flow (more on that later).
Because it was a bit loose near the cap, I used a strip of wrapper to tighten it a bit...
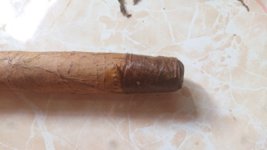
DSC_1826.JPG
signal-2023-03-29-22-09-31-759-2~2.jpg

signal-2023-03-29-22-09-31-759~2.jpg
This is what it looked like when cut for smoking.
As you can see, there's a hollow through the center.

Smoking it:
I'm not sure if it was still a little damp. It didn't feel it particularly. I used the filler and binder straight from the bag, only cased the wrapper.
It took a little effort to light. Then for a fair chunk of the length, I would have to puff it quite aggressively to get some decent smoke. At about halfway through, it started smoking much better. But later on I noticed it was burning down through the middle like an inverse cone. Obviously because of the hollow through the center.

Overall, I was quite happy with it, for a first roll. But have identified areas that need improving.
I'm open to any suggestions/advice that you guys have.

First issue, is the bunching. I just layered them on top (book?) and rolled them up (cut the ends and placed them in the middle first). This rolling is what left the hole in the middle. I either need to roll it much tighter at the start, or change to a different style of bunching.
I also should have cut off an inch or two of the cap end, would this have helped the draw?

Something else that I messed up, when I rolled the binder on, the foot was on the right.I orientated it so the veins ran along the length. But when I came to the wrapper, I carefully took one leaf out of the bag, cut the main vein out and placed one half back into the back while wetting the other half. Only after it was wet that I realized I couldn't orient it with the underside of the leaf facing upwards AND the veins running along the length. It seems that when you get to wrapping, there's "Left" and "right" handed sections.
So I turned the stick around so the foot was on the left and applied the wrapper. But then of course I was rolling it backwards to how I'd done it with the binder. It felt like I couldn't apply as much pressure to get the wrapper tight. Not sure if this would effect the smoking much, or just the aesthetics. Lesson for next time, get all the leaf out first and check they fit together.
I probably should have left the wrapper to soak up the water for a bit longer. I only sprayed it once I'd finished putting the binder on. It was ok, but the scrap that I left wet overnight for the cap was much more pliable.

Ok, that's it. Like I said, please do critique it. If there's something I've missed, or something you think I should do differently.
 

GreenDragon

Well-Known Member
Joined
Jan 18, 2018
Messages
2,040
Points
113
Location
Charlotte, NC
Sounds pretty successful for a first roll - congratulations! Each one will get progressively better. Roll one, smoke one, etc. I always check the draw once the binder is on, so I can immediately re-roll it if there is an issue: too tight or too loose.

Also, I usually case all my leaf the day before to let the moisture equalize through all the leaf. One bag for filler (low case), one for binder/wrapper (high case). If you don't get to finish rolling all your prepared leaf, either let it dry back out before storing or pop it in the refrigerator for up to a week.

Any of the major bunching techniques require practice to get right. Don't be discouraged.
 

Snowblithe

Moderator
Joined
Aug 9, 2020
Messages
301
Points
93
Location
Calgary
Nice work!
I, like you, started by just stacking the filler and rolling it up. It does work okay sometimes but it is very inconsistent and prone to burn issues because the leaves squeeze together too tightly in some spots and too loose in others.
Other bunching methods work much better and more consistent. The key, as I think of it, is to make each filler leaf into a sort of spring to push against all the other leaves to allow space for airflow and to provide even compression.
I like to use the tube method because I find it easier to keep track of the different primings (seco, viso, ligero) and control where they end up inside the bunch. It also generally has good and consistent airflow even after being squished together by the binder.
Corrugating the leaves (accordion style) also provides great airflow and the springiness to maintain it under compression though I find it harder to control leaf distribution and sometimes it can leave a little space between the filler and binder which can lead to ‘runs’ in the burn. This is because (in my mind at least) the leaves end up kinda square shaped, which, thinking back to my preschool days, doesn’t fit in a round hole/ cigar.
But all you really HAVE to do is scrunch up the leaves somehow along the length of the cigar and squeeze them inside a binder. That said it is worth trying different things to see what you like best.
 
Last edited:

HKRolling

Active Member
Joined
Mar 10, 2023
Messages
28
Points
13
Location
Hong Kong
Sounds pretty successful for a first roll - congratulations! Each one will get progressively better. Roll one, smoke one, etc. I always check the draw once the binder is on, so I can immediately re-roll it if there is an issue: too tight or too loose.

Also, I usually case all my leaf the day before to let the moisture equalize through all the leaf. One bag for filler (low case), one for binder/wrapper (high case). If you don't get to finish rolling all your prepared leaf, either let it dry back out before storing or pop it in the refrigerator for up to a week.

Any of the major bunching techniques require practice to get right. Don't be discouraged.
Thanks.
I'll try casing it a bit earlier next time.
I did take a draw once the binder was on, felt ok. But the air was probably just flowing through the center hole.
 

HKRolling

Active Member
Joined
Mar 10, 2023
Messages
28
Points
13
Location
Hong Kong
Nice work!
I, like you, started by just stacking the filler and rolling it up. It does work okay sometimes but it is very inconsistent and prone to burn issues because the leaves squeeze together too tightly in some spots and too loose in others.
Other bunching methods work much better and more consistent. The key, as I think of it, is to make each filler leaf into a sort of spring to push against all the other leaves to allow space for airflow and to provide even compression.
I like to use the tube method because I find it easier to keep track of the different primings (seco, viso, ligero) and control where they end up inside the bunch. It also generally has good and consistent airflow even after being squished together by the binder.
Corrugating the leaves (accordion style) also provides great airflow and the springiness to maintain it under compression though I find it harder to control leaf distribution and sometimes it can leave a little space between the filler and binder which can lead to ‘runs’ in the burn. This is because (in my mind at least) the leaves end up kinda square shaped, which, thinking back to my preschool days, doesn’t fit in a round hole/ cigar.
But all you really HAVE to do is scrunch up the leaves somehow along the length of the cigar and squeeze them inside a binder. That said it is worth trying different things to see what you like best.
Thanks.
I like the explanation of making them like little springs that push against each other. From the cross-section, I noticed a few areas where they are compressed tightly.
I had just rolled my second one before reading your post. But I'll try tubes next time.
When you talk about keeping track of where the different leaves are, are there specific places that you want them? Or just making sure the ligero and seco are evenly distributed throughout?
 

HKRolling

Active Member
Joined
Mar 10, 2023
Messages
28
Points
13
Location
Hong Kong
Update:
I was playing around with the little chunk that I cut off. I realized that continued rolling (in the initial roll direction) would eventually tighten the whole bunch as it's a spiral. I had to remove the wrapper, as it was on the other way. But after rolling it loads, it looked a lot better inside.
 

Snowblithe

Moderator
Joined
Aug 9, 2020
Messages
301
Points
93
Location
Calgary
I like the explanation of making them like little springs that push against each other.
Thanks, I'm glad you find it helpful.
When you talk about keeping track of where the different leaves are, are there specific places that you want them? Or just making sure the ligero and seco are evenly distributed throughout?
Generally you want to have your faster burning leaf, usually seco, placed concentrically on the outside of the bunch with the slower burning viso inside and the ligero in the very center. Just so the cigar burns evenly and doesn't tunnel. Unless you want to gamble... :)
 

Knucklehead

Moderator
Founding Member
Joined
Oct 18, 2012
Messages
12,442
Points
113
Location
NE Alabama
I'm using the melodioso Cremosa kit from WLT.
I thought I'd share some pics of my first roll.
I have watched a few rolling vids before, but I didn't watch any right before I rolled as I was eager to get rolling and had limited time. So probably did something a bit wrong.View attachment 45342
This is with the binder on.


View attachment 45343
With the wrapper.

View attachment 45344
I wrapped it in paper to shape and dry it

View attachment 45345
After removing the paper.

I didn't really cut much off from the cap end. In hindsight, I probably should have. Even though the bit that is cut off can be rolled into other cigars, there's something that feels wasteful about cutting chunks off. I'm wondering now whether it's needed to allow proper air flow (more on that later).
Because it was a bit loose near the cap, I used a strip of wrapper to tighten it a bit...
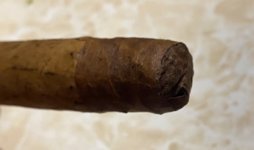
View attachment 45347
View attachment 45348

View attachment 45349
This is what it looked like when cut for smoking.
As you can see, there's a hollow through the center.

Smoking it:
I'm not sure if it was still a little damp. It didn't feel it particularly. I used the filler and binder straight from the bag, only cased the wrapper.
It took a little effort to light. Then for a fair chunk of the length, I would have to puff it quite aggressively to get some decent smoke. At about halfway through, it started smoking much better. But later on I noticed it was burning down through the middle like an inverse cone. Obviously because of the hollow through the center.

Overall, I was quite happy with it, for a first roll. But have identified areas that need improving.
I'm open to any suggestions/advice that you guys have.

First issue, is the bunching. I just layered them on top (book?) and rolled them up (cut the ends and placed them in the middle first). This rolling is what left the hole in the middle. I either need to roll it much tighter at the start, or change to a different style of bunching.
I also should have cut off an inch or two of the cap end, would this have helped the draw?

Something else that I messed up, when I rolled the binder on, the foot was on the right.I orientated it so the veins ran along the length. But when I came to the wrapper, I carefully took one leaf out of the bag, cut the main vein out and placed one half back into the back while wetting the other half. Only after it was wet that I realized I couldn't orient it with the underside of the leaf facing upwards AND the veins running along the length. It seems that when you get to wrapping, there's "Left" and "right" handed sections.
So I turned the stick around so the foot was on the left and applied the wrapper. But then of course I was rolling it backwards to how I'd done it with the binder. It felt like I couldn't apply as much pressure to get the wrapper tight. Not sure if this would effect the smoking much, or just the aesthetics. Lesson for next time, get all the leaf out first and check they fit together.
I probably should have left the wrapper to soak up the water for a bit longer. I only sprayed it once I'd finished putting the binder on. It was ok, but the scrap that I left wet overnight for the cap was much more pliable.

Ok, that's it. Like I said, please do critique it. If there's something I've missed, or something you think I should do differently.
Excellent Cuban cigar rolling video.


SlamFire

Well-Known Member
Joined
Apr 5, 2022
Messages
125
Points
63
Location
Michigan
I'm using the melodioso Cremosa kit from WLT.
I thought I'd share some pics of my first roll.
I have watched a few rolling vids before, but I didn't watch any right before I rolled as I was eager to get rolling and had limited time. So probably did something a bit wrong.View attachment 45342
This is with the binder on.


View attachment 45343
With the wrapper.

View attachment 45344
I wrapped it in paper to shape and dry it

View attachment 45345
After removing the paper.

I didn't really cut much off from the cap end. In hindsight, I probably should have. Even though the bit that is cut off can be rolled into other cigars, there's something that feels wasteful about cutting chunks off. I'm wondering now whether it's needed to allow proper air flow (more on that later).
Because it was a bit loose near the cap, I used a strip of wrapper to tighten it a bit...
View attachment 45347
View attachment 45348

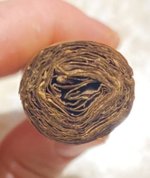
View attachment 45349
This is what it looked like when cut for smoking.
As you can see, there's a hollow through the center.

Smoking it:
I'm not sure if it was still a little damp. It didn't feel it particularly. I used the filler and binder straight from the bag, only cased the wrapper.
It took a little effort to light. Then for a fair chunk of the length, I would have to puff it quite aggressively to get some decent smoke. At about halfway through, it started smoking much better. But later on I noticed it was burning down through the middle like an inverse cone. Obviously because of the hollow through the center.

Overall, I was quite happy with it, for a first roll. But have identified areas that need improving.
I'm open to any suggestions/advice that you guys have.

First issue, is the bunching. I just layered them on top (book?) and rolled them up (cut the ends and placed them in the middle first). This rolling is what left the hole in the middle. I either need to roll it much tighter at the start, or change to a different style of bunching.
I also should have cut off an inch or two of the cap end, would this have helped the draw?

Something else that I messed up, when I rolled the binder on, the foot was on the right.I orientated it so the veins ran along the length. But when I came to the wrapper, I carefully took one leaf out of the bag, cut the main vein out and placed one half back into the back while wetting the other half. Only after it was wet that I realized I couldn't orient it with the underside of the leaf facing upwards AND the veins running along the length. It seems that when you get to wrapping, there's "Left" and "right" handed sections.
So I turned the stick around so the foot was on the left and applied the wrapper. But then of course I was rolling it backwards to how I'd done it with the binder. It felt like I couldn't apply as much pressure to get the wrapper tight. Not sure if this would effect the smoking much, or just the aesthetics. Lesson for next time, get all the leaf out first and check they fit together.
I probably should have left the wrapper to soak up the water for a bit longer. I only sprayed it once I'd finished putting the binder on. It was ok, but the scrap that I left wet overnight for the cap was much more pliable.

Ok, that's it. Like I said, please do critique it. If there's something I've missed, or something you think I should do differently.
Save your cutoff chunks in a zip lock bag or other resealable container - you can use the scraps in short filler cigars, and then very little goes to waste...
 

FrostD

Well-Known Member
Joined
Dec 29, 2020
Messages
725
Points
93
Location
Wisconsin
Another excellent rolling video by a forum member:
View: https://youtu.be/TCqCESg3Q7c
Love this video! I can’t even recall how many times I watched it over and over again when I started rolling cigars. Web made it very easy to understand and produce good cigars. The best lesson I’ve found is repetition, repetition, repetition! Every day doing something with tobacco, be it, prepping, binding, wrapping at least 1 (if not more) sticks daily. Eventually it all becomes easier. However, there are still days where things just don’t go right. Don’t let those days get you down, as those are the days that keep making you better! Keep at it and you will indeed get to the point where YOU want to be.

R.I.P. @webmost. Great teacher and even better guy that always looked out for the new rollers and helped everyone along on the journey.
 
Top