some more precautionary advise that may or may not apply. i tried doing my own ph cause i know someone that works in water and has expensive meters. so i took 1-1 soil / distilled water and coffee filtered it to try and get some somewhat clean water in a jar. then they told me 7.4. and my state university test told me 6.7 from the same dirt. i couldnt get anywhere trying to figure out why that might be. but that was different enough to matter.
You are using an out of date browser. It may not display this or other websites correctly.
You should upgrade or use an alternative browser.
You should upgrade or use an alternative browser.
New from Texas - Need a grow plan
- Thread starter peterd
- Start date

Garland Soil PH Meter
Achieve the perfect pH balance for your plants with the Garland Soil pH Meter. This user-friendly tool requires no batteries and provides instant readings for soil acidity or alkalinity.
Bob
With pH testing I hear you. top, slopes, and bottom of slopes, near concrete, foundations, etc. etc. will all have different pH values in the soil. When you get a soil test done you need to mix uniformly the samples from multiple sampling sites together and then send it in to the lab. If you test the same mixture sent to the lab you will have a better idea of your own testing as compared to the lab. If you mix a sample selection a second time you'll likely have yet again a different result, same as if you single sample but from a slightly different location. This I think is the best take away is not to be too worried that you don't get the same results as a lab because of the above you need to blend an average out over your entire property grow area. Or pay for lots of individual spot tests. This also means when treating your soil with amendments you will be over amending in some areas and under amending in others. But the average should be good enough provided the sample used for the tests was averaged well enough.
I first got my result then curious I searched for soil in my area and the answers they gave was we all have heavy gumbo soil that is alkaline. While I am not as worried about the exact figure of 7.5 pH, I am confident I am in the right ballpark as my alkaline test results match the alkaline results of the overal general area that were done by government scientists.
I use something like this rather than the Garland style one, PH-200 HM Digital Professional Grade Handheld pH Meter (uswatersystems.com). I use it in brewing and other applications, and it is also lab calibrated to multiple distilled water samples with acidification powders to known pH values before I tested.
For the soil composition testing I have this procedure you all may want to give a go just for the fun of it:
Soil of course is a mixture comprised of major soil particles, organic matter, water, air and living organisms, all of which are important to the overall health of the soil and the plants that grow in it. The three primary soil particles are sand, silt, and clay. The relative percentages of these components present make up the soil’s texture. Texture is important to overall soil and plant health as it relates to soil porosity, which refers to the pore spaces where air and water reside.
The ideal soil texture is a mix of sand, silt, and clay particles, known as a loam. In most cases the particles will not be balanced, and the soil will need to be altered by adding organic amendments. To evaluate soil texture, use a simple jar test to determine the percentages of sand silt, and clay. Once the percentages are calculated, the soil textural triangle can be used to determine the soil type.
What you will need to test:
1. Straight edged, clear jar
2. Permanent marker
3. Ruler
5. Watch or stop watch
6. 1 tablespoon of powdered dishwashing detergent
7. Mesh sieve or old colander
How you set up the test (1 minute, 2 hours, 48 hours):
1. Using a mesh sieve or old colander, sift the soil to remove any debris, rocks, and large organic matter (leaves, sticks, roots, etc.).
2. Fill the jar ⅓ full of the soil to be tested
3. Fill the remainder of the jar with clean water, but leave some space at the top.
4. Add 1 tablespoon of powdered dishwashing detergent
5. Cap the jar and shake vigorously until the soil turns into a uniform slurry.
6. Set on a level surface and time for one minute.
7. Place a mark the outside of the jar, showing the coarse sand layer settled at the bottom of the jar.
8. Leave the jar in a level spot for 2 hours.
9. Mark the top of the next settled layer with the permanent marker. This is the silt layer.
10. Leave the jar on a level spot for 48 hours.
11. Mark the top of the next settled layer with the permanent marker. This is the clay layer that has settled on top of the silt layer.
12. Using a ruler, measure and record the height of each layer, and the total height of all three layers. Use the soil texture analysis worksheet below to record results.
How to draw three lines on the graph and determine your exact soil type:
Example Graph Result:
Soil Texture Analysis “The Jar Test” Worksheet
Soil texture triangle to estimate the soil type for the site
Measurements:
Height of sand layer ________inches / cm
Height of silt layer ________inches / cm
Height of clay layer ________inches / cm
TOTAL HEIGHT OF LAYERS ________inches / cm
% SAND=(sand height)/(total height) x 100 =___________ % SAND
% SILT=(silt height)/(total height) x 100 =____________ % SILT
% CLAY=(clay height)/(total height) x 100 =____________ % SILT
Edit: At the 1 minute mark my soil has no delineated layers at all of sand, so you have an idea where my soil's results are headed!
PeterD
I first got my result then curious I searched for soil in my area and the answers they gave was we all have heavy gumbo soil that is alkaline. While I am not as worried about the exact figure of 7.5 pH, I am confident I am in the right ballpark as my alkaline test results match the alkaline results of the overal general area that were done by government scientists.
I use something like this rather than the Garland style one, PH-200 HM Digital Professional Grade Handheld pH Meter (uswatersystems.com). I use it in brewing and other applications, and it is also lab calibrated to multiple distilled water samples with acidification powders to known pH values before I tested.
For the soil composition testing I have this procedure you all may want to give a go just for the fun of it:
Soil of course is a mixture comprised of major soil particles, organic matter, water, air and living organisms, all of which are important to the overall health of the soil and the plants that grow in it. The three primary soil particles are sand, silt, and clay. The relative percentages of these components present make up the soil’s texture. Texture is important to overall soil and plant health as it relates to soil porosity, which refers to the pore spaces where air and water reside.
The ideal soil texture is a mix of sand, silt, and clay particles, known as a loam. In most cases the particles will not be balanced, and the soil will need to be altered by adding organic amendments. To evaluate soil texture, use a simple jar test to determine the percentages of sand silt, and clay. Once the percentages are calculated, the soil textural triangle can be used to determine the soil type.
What you will need to test:
1. Straight edged, clear jar
2. Permanent marker
3. Ruler
5. Watch or stop watch
6. 1 tablespoon of powdered dishwashing detergent
7. Mesh sieve or old colander
How you set up the test (1 minute, 2 hours, 48 hours):
1. Using a mesh sieve or old colander, sift the soil to remove any debris, rocks, and large organic matter (leaves, sticks, roots, etc.).
2. Fill the jar ⅓ full of the soil to be tested
3. Fill the remainder of the jar with clean water, but leave some space at the top.
4. Add 1 tablespoon of powdered dishwashing detergent
5. Cap the jar and shake vigorously until the soil turns into a uniform slurry.
6. Set on a level surface and time for one minute.
7. Place a mark the outside of the jar, showing the coarse sand layer settled at the bottom of the jar.
8. Leave the jar in a level spot for 2 hours.
9. Mark the top of the next settled layer with the permanent marker. This is the silt layer.
10. Leave the jar on a level spot for 48 hours.
11. Mark the top of the next settled layer with the permanent marker. This is the clay layer that has settled on top of the silt layer.
12. Using a ruler, measure and record the height of each layer, and the total height of all three layers. Use the soil texture analysis worksheet below to record results.
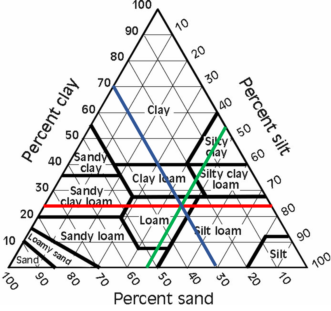
How to draw three lines on the graph and determine your exact soil type:
Example Graph Result:

- Use the soil texture triangle to estimate the soil type for the site.
- The clay percentages are listed on the left side of the triangle. Lines corresponding to clay percentages extend from the percentages reading left to right (see red line).
- The silt percentage is on the right side, with lines extending downwardly, diagonally right to left (see green line).
- The sand percentage is on the right side, with lines extending upwardly, diagonally right to left (see blue line).
- Track the lines with the percentages measured and find the spot on the triangle where all three lines intersect. The region where these lines intersect indicates the soil type present. The example shown represents a loam soil texture.
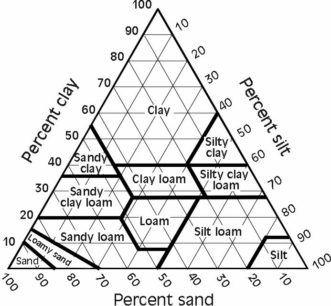
Soil Texture Analysis “The Jar Test” Worksheet
Soil texture triangle to estimate the soil type for the site

Measurements:
Height of sand layer ________inches / cm
Height of silt layer ________inches / cm
Height of clay layer ________inches / cm
TOTAL HEIGHT OF LAYERS ________inches / cm
% SAND=(sand height)/(total height) x 100 =___________ % SAND
% SILT=(silt height)/(total height) x 100 =____________ % SILT
% CLAY=(clay height)/(total height) x 100 =____________ % SILT
Edit: At the 1 minute mark my soil has no delineated layers at all of sand, so you have an idea where my soil's results are headed!
PeterD
Last edited:
@GreenDragon. I also want to get off my keister and put in a proper garden so that's why I'm motivated to attack the mucky gumbo soil since its not just baccy for its use.
i disagree with normal directions for the soil composition test. if i follow the directions my clay line would end up below my silt line, which makes no sense. with silt visible tiny streams of water percolate up through it for about 2-3 days and the layer lowers by the amount of water that left. but that lowers faster than clay layer increases. so its such a moving goal post that you can actually get a negative clay result. in times like these i say screw the system and make up my own rules lol.
i haven't seen your sample but if you have something that settles in the first 5 seconds but you cant visually tell it from what comes after. you likely have to shake more to get the sand cleaner. i repeatedly shake a few minutes then set down for 5 min. and dont stop until sand is a clean clear line. then i wait 4-5 days until the water starts to clear meaning the clay is settled. and by this time the silt is done settling so i do all sharpie lines at the end.
also if whoever has a kitchen scale and you would rather use a 2 liter or something disposable. you could do the measurments by weighing how much water fits between the lines.
then it dont matter if its a perfect cylinder since your not trying to measure volume based on height.
I think I want to start with a focus on pipe and building a base it try different blends.
So fair have a very small list
I have Black Sea Samsun down for sure.
A Burley of some sort.
Cherry Red
and that's where I then wonder what needs adding
I have a big pressure canner that I can use for the Cavendish process but wonder what the best strains at Northwood are coming out the best in that process. I heard a Bright Leaf turned out good but not sure which one -- Virginia Bright Leaf? Or did that mean section of the stalk and not a variety per use, still a bit muddled on thefiner terminology details.
I love the aromatics of orientals but other than BSS what would be recommended to round out the oriental selection or will that cover most blending scenarios.
Last edited:
Oriental: Prilep 66-9/7
Flue-cured Virginia makes wonderful Cavendish. I've never tried air-cured Virginia. Every tobacco variety makes a Cavendish of a different character, with the nicotine strength dependent on the variety.
Bob
Flue-cured Virginia makes wonderful Cavendish. I've never tried air-cured Virginia. Every tobacco variety makes a Cavendish of a different character, with the nicotine strength dependent on the variety.
Bob
Excellent thank you.
Black Sea Samsun -- Oriental
Prilep 66-9/7 - Oriental / Close stacking sounds interesting
Cherry Red -- Bright Leaf
Virginia Bright Leaf -- Bright Leaf / Cavendish candidate / open to correction if better candidate
TN86 -- Burley / I don't know the inherent soil diseases here yet so resistant sounds good
Should I include a dark variety, not sure their use yet.
It is all happening now. I have dug up thirty 90% clay holes, removed and plugged thirty lawn sprinklers with extension pipes. Managed somehow only a single blister digging up that sticky muck. I have another ten to do tomorrow night. This is Texas so for those overseas I work during the last hours in the day before dark to enjoy 82 degrees (28 C) instead of 100 degrees in the day. So I still sweat like buggery!
Today I built the largest cart that will fit through my fence gate to the backyard.
This one if anyone is curious: https://shop.polartrailer.com/utility-cart.html
Then a break for my daughters birthday before starting next Monday with three dump trucks of professional compost. I am going to stagger the dump trucks one each day so I will only have to fill, wheel and dump thirty cart loads from front driveway to back yard each day.
Tomorrow I go in to finalize my reservation for renting a Honda 8hp rear tine 20" walk behind rototiller.
I'm either going to end up really fit or maybe this will be the last post you will read from me
msmith86
Active Member
I just read through, you have some curious goings there, and welcome to FTT. I laughed at your attic comment because here in PA it's been heat index 100-110° for weeks now and our attics are always crazy in our hot and humid summers, so that's also my plan. I'm also looking forward to some pictures of your fun, because pics or it didn't happen.I just realized with the heat here in Texas I could use the attic space in my roof as a kiln
GreenDragon
Well-Known Member
I just realized with the heat here in Texas I could use the attic space in my roof as a kiln
I do - works well.
3650 sq.ft. being brought into production. 3 days digging through heavy clay in the high heat and humidity. 40 sprinklers dug up and PVC ground pipe connections plugged ready for soil amendments to be broadcast onto the surface for tilling.
This year has been amazing for rain, I have not turned on the irrigation once this summer and still have this.
Note: Holes are 2 days of baking in the sun to dry them out. When dug they were dark brown wet sticky muck. The grass can tap this underground moisture through the summer heat and stay as green as it is without irrigation.
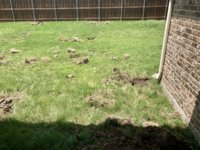
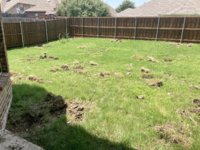
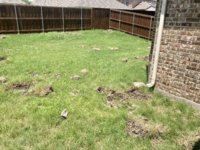
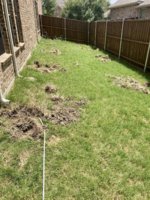
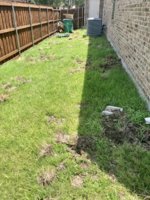
I'm mapping all the underground connections to later attach risers for irrigation purposes.

The first of many more blisters to come.
This year has been amazing for rain, I have not turned on the irrigation once this summer and still have this.
Note: Holes are 2 days of baking in the sun to dry them out. When dug they were dark brown wet sticky muck. The grass can tap this underground moisture through the summer heat and stay as green as it is without irrigation.


I'm mapping all the underground connections to later attach risers for irrigation purposes.

The first of many more blisters to come.
Last edited:
With some input from @ChinaVoodoo I think I have a good final selection list for the first go at tobacco next year with the focus the first go around being pipe tobacco:
o Black Sea Samsun -- Oriental (group 1)
o Prilep 66-9/7 -- Oriental (group 2)
o Cherry Red -- Bright Leaf
o Virginia Bright Leaf -- Bright Leaf / Flue-cured / Cavendish candidate / open to correction if better candidate
o TN86 -- Burley / I don't know the inherent soil diseases here yet so resistant sounds good
o Herzegovina Flor (Oriental) OR Goose Creek Red (Dark Virginian) -- As the Other tobacco to mix it up in the mixes
Percentages I have not worked out, the Virginia Bright and Cherry Red will be about 50% of plantings, the rest I'll have to figure out how many to grow.
I'll be hitting up @skychaser with an email soon with an order request. I have TN86 and BSS seed already but will need the rest. Plus he has one of my favorite squash, Queensland Blue and pickling cucumbers and other seed goodies I'd like to get from him.
Last edited:
Alpine
Moderator
Goose creek red (together with symbol 4) is one of my favourite strains. Its taste reminds many “Virginia bright” but is much more intense, it’s easy to air cure and suckers are nearly none. Leaf thickness is incredible and yield per plant (in terms of weight) rivals with modern hybrids. Definitely a keeper for me. The only bright leaf strain that did better (for me, in my environment) has been yellow Pryor, but the smoke is not as tasty. I’ll wait your observations on Herzegovina Flor, I have seeds of (kindly sent me by a forum member) but I’ve not had the opportunity to field test them... yet.
MadFarmer
Well-Known Member
My understanding is that a squash vine borer moth (looks like a wasp) lays eggs at the base of the squash vine, and it is its larvae (caterpillars) that bore into the vine. If that is the case, then ===>>> inject BT directly into the stems.
Living with squash vine borer: Texas A&M
 extension.umn.edu
Bob
Living with squash vine borer: Texas A&M
Squash vine borers
How to identify squash vine borers Adults Adult moths are unique in that they fly during the day and mimic wasps. Moths are about 1/2 inch long with an orange abdomen with black dots. The first pair of wings are metallic green while the back pair of wings are clear. The back wings are folded...
Bob
GreenDragon
Well-Known Member
Yep, they wiped out my spring planting of crooknecks this year. Our second batch seems to be doing OK though.

