First post but I wanted to share my curing build after gleaning information from here, figured it's fair to give back.
We have a small farm in central Florida and grow 200 plants each spring and fall. We were growing Virginia Gold and Rustica for novelty but are switching over our mainstay to Sobolchskii 33 after testing plotting a 100 plants this spring.The yeild results are pretty much equal in the end but the 33 matures a lttle faster with slightly bigger leaves. The big seller for us was the lack of pest interest. We found the horn and army worms tend to simply leave 33 alone after a small nibble. Going forward this fall we will plant 10:1 Sobolchskii / Virginia Gold plot using the VG as "bait" for pest management.
But on to the cabinet...

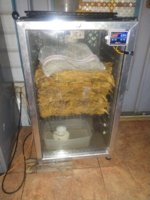
I used a old mini fridge, the fridge we had that already made two passes around the farm, first time as a "new to us" (aka free) second-hand drink fridge, it's second life was as a chicken egg incubator, it's 3rd life is now for curing/fermentation.
We plan on upscaling to to a "full sized" freezer when I can find one. (Freezers are better insulated than fridges are). Otherwise we'll be running roughly 4-6 loads through this little guy post season.
I wanted to keep this thing as simple as possible using a single control voltage and staying out of a mess of relays and wiring so everything is 110v on the control side. I also wanted to have one single plug and everything self contained in the fridge without external ducting, hoses, bins or chords.

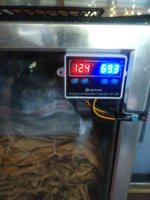
The temp / humidity controller is a KETOTEK KT100 Temperature Humidity Controller. These run about $20-$25 dollars on Amazon or $15 from AliExpress of you can wait on the shipping. The unit is rated for 10 amps total output.
The heating element is a PTC (Positive Temperature Coefficient) 110v 750W heating element. These are sometimes called a "ceramic air heater". These run about $15-$20 depending on where you find them. For the sake of being technical this heater draws about 6 amps total. It's run time at start up or when the cabinet is empty is deceivingly long (10-15 mins to hit 125 degrees). But when loaded and up to temp it only cycles on for 3 minutes about once every 35-40 minutes.

I have a second heater that I didn't use in this build but if I go up to a larger freezer cabinet I'll need it and a 110v relay to take the combined load (1500 watts) of both elements (12 amps) off of the temp controller.
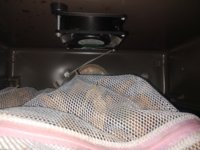
I have two 110v 4" permanent magnet fans that are wired to run 24/7. One is positioned in the top of the cabinet just to move air, the other is affixed to the heating element. Because these are wired direct and not pulling power from the controller the amperage was irrelevant to the build. If I add the second heating element to a larger cabinet later I'll add a third fan for it.

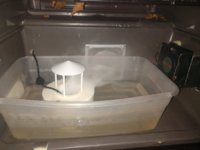
Because I didn't want to fight or fret with humidity and after a few test run fails at maintaining humidity correctly I opted for a Mxmoonant 350ml/H ultrasonic fog generator that was around $18 on Amazon. There are a ton of these little fog makers out there for less money but I spent the extra $5 when buying it to get a floating model with a top cover to prevent fussing with water levels and/or splashing issues.

The unit works GREAT as a humidifier (I'd be disappointed in it as a fogger) and only needs to run for 7-10 seconds every 30 mins to keep the humidity up. It pulls 0.2 amps when running using a 24v DC power supply plugged into the Keotech controller's 110v output. Water usage is about 1.3 pint per day.
The fridge had 3 inch top and bottom vent holes already drilled into it's back side from the egg ncubator project. I simply taped those over and reduced the hole size down to 1 inch. The air exchange is pretty substantial, enough to blow a lighter flame around.
For loading / unloading, the tobacco is sorted and tied into 2-3 inch tall compressed bundles so the stack can easily be taken out and flipped around periodically. The top bag in the photo is a regular laundry sack we use for curing Rustica because the leaves are so small.
Because I am slightly overkill on BTUs and humidity outputs for the cabinets size I had to play with the cut in and cut out temp and humidity ranges a bit at first. My mistake was not just loading the cabinet full (20lbs) and trying to "test run" it with too little mass inside. Once I full loaded it it easy to keep it -+/- 2 points of 125 degrees and 70% humidity. Under half full and it will slightly overshoot both targets by + 5 points. I can find a big rock to add mass to a half full load but honestly the 5 point variance isn't going to hurt anything.
Short sweet and simple... all I have to do is add water every 5 days and flip the stack bundles around.
We have a small farm in central Florida and grow 200 plants each spring and fall. We were growing Virginia Gold and Rustica for novelty but are switching over our mainstay to Sobolchskii 33 after testing plotting a 100 plants this spring.The yeild results are pretty much equal in the end but the 33 matures a lttle faster with slightly bigger leaves. The big seller for us was the lack of pest interest. We found the horn and army worms tend to simply leave 33 alone after a small nibble. Going forward this fall we will plant 10:1 Sobolchskii / Virginia Gold plot using the VG as "bait" for pest management.
But on to the cabinet...

I used a old mini fridge, the fridge we had that already made two passes around the farm, first time as a "new to us" (aka free) second-hand drink fridge, it's second life was as a chicken egg incubator, it's 3rd life is now for curing/fermentation.
We plan on upscaling to to a "full sized" freezer when I can find one. (Freezers are better insulated than fridges are). Otherwise we'll be running roughly 4-6 loads through this little guy post season.
I wanted to keep this thing as simple as possible using a single control voltage and staying out of a mess of relays and wiring so everything is 110v on the control side. I also wanted to have one single plug and everything self contained in the fridge without external ducting, hoses, bins or chords.

The temp / humidity controller is a KETOTEK KT100 Temperature Humidity Controller. These run about $20-$25 dollars on Amazon or $15 from AliExpress of you can wait on the shipping. The unit is rated for 10 amps total output.
The heating element is a PTC (Positive Temperature Coefficient) 110v 750W heating element. These are sometimes called a "ceramic air heater". These run about $15-$20 depending on where you find them. For the sake of being technical this heater draws about 6 amps total. It's run time at start up or when the cabinet is empty is deceivingly long (10-15 mins to hit 125 degrees). But when loaded and up to temp it only cycles on for 3 minutes about once every 35-40 minutes.

I have a second heater that I didn't use in this build but if I go up to a larger freezer cabinet I'll need it and a 110v relay to take the combined load (1500 watts) of both elements (12 amps) off of the temp controller.
I have two 110v 4" permanent magnet fans that are wired to run 24/7. One is positioned in the top of the cabinet just to move air, the other is affixed to the heating element. Because these are wired direct and not pulling power from the controller the amperage was irrelevant to the build. If I add the second heating element to a larger cabinet later I'll add a third fan for it.

Because I didn't want to fight or fret with humidity and after a few test run fails at maintaining humidity correctly I opted for a Mxmoonant 350ml/H ultrasonic fog generator that was around $18 on Amazon. There are a ton of these little fog makers out there for less money but I spent the extra $5 when buying it to get a floating model with a top cover to prevent fussing with water levels and/or splashing issues.

The unit works GREAT as a humidifier (I'd be disappointed in it as a fogger) and only needs to run for 7-10 seconds every 30 mins to keep the humidity up. It pulls 0.2 amps when running using a 24v DC power supply plugged into the Keotech controller's 110v output. Water usage is about 1.3 pint per day.
The fridge had 3 inch top and bottom vent holes already drilled into it's back side from the egg ncubator project. I simply taped those over and reduced the hole size down to 1 inch. The air exchange is pretty substantial, enough to blow a lighter flame around.
For loading / unloading, the tobacco is sorted and tied into 2-3 inch tall compressed bundles so the stack can easily be taken out and flipped around periodically. The top bag in the photo is a regular laundry sack we use for curing Rustica because the leaves are so small.
Because I am slightly overkill on BTUs and humidity outputs for the cabinets size I had to play with the cut in and cut out temp and humidity ranges a bit at first. My mistake was not just loading the cabinet full (20lbs) and trying to "test run" it with too little mass inside. Once I full loaded it it easy to keep it -+/- 2 points of 125 degrees and 70% humidity. Under half full and it will slightly overshoot both targets by + 5 points. I can find a big rock to add mass to a half full load but honestly the 5 point variance isn't going to hurt anything.
Short sweet and simple... all I have to do is add water every 5 days and flip the stack bundles around.


