Buy Tobacco Leaf Online | Whole Leaf Tobacco

kiln

CigarNews

Active Member
Joined
Aug 28, 2012
Messages
35
Points
0
Location
Houston, tx
I have around 55 plants I will be curing, starting this week. Does anyone know where I can buy a tobacco kiln to ferment them, following the curing process? Please advise. Thanks.
 

johnlee1933

Moderator
Founding Member
Joined
Aug 21, 2011
Messages
3,970
Points
0
Location
Near Danbury, CT
I have around 55 plants I will be curing, starting this week. Does anyone know where I can buy a tobacco kiln to ferment them, following the curing process? Please advise. Thanks.
Most of the folks here (me included) built their own. Mine is a dead freezer I gutted, Chickens is a whole room. Check the threads and you'll get lots of ideas. Good luck.-- J
 

leverhead

Well-Known Member
Joined
Jan 16, 2012
Messages
3,204
Points
83
Location
Grimes County Texas
I just did a quick Google search, no luck. I got a side by side commercial refrigerator (stainless lined) from Port City Surplus 5305 Jensen Dr. to do flue-curing in. You've got to poke around to find what you want and do some modifying. Bring your own truck and you'll be in and home in a morning.
 

LeftyRighty

Moderator
Founding Member
Joined
Jul 23, 2011
Messages
516
Points
63
Location
west central MO
I am about to finish buiilding my kiln fermentor - converted 15 cu ft upright freezer. All the electrical controls, heating, venting and RH control is complete. I just need to complete the door & seal.
I removed the interior door panel, because the shelves extend 4+ inches into the space, and I wanted the extra room. This exposed the door insulation - am now coating/painting the insulation surface, using the freezer box as a work surface. The whole thing is covered with a drop cloth, so I cannot take photos now.
I'll post photos of what I've done in about a week.
It's not that what I'm doing is a good example of 'how-to-build-a-kiln', but it may give you some ideas when you build yours.

(edit) I grow about 140-180 plants a year for cigs. After air-curing and drying, I de-rib the leaf, and stack into a bale. These bales are what will go into my kiln. I figure about 2 runs will do the whole crop. If I tied the whole leaf into hands, and hung to ferment in this kiln, it would take a year to do the crop.
 
Last edited:

deluxestogie

Administrator
Staff member
Joined
May 25, 2011
Messages
24,723
Points
113
Location
near Blacksburg, VA
Amazing that no one sells these. Would be a good side business for people like me that do not have time to build.
A commercial product would likely need thousands of sales to recoup the tooling and design costs. More likely to be financially successful is a pre-cut, pre-drilled wooden kit that simply needs assembly, and with a thermostat pre-wired to a plug and an outlet.

Bob
 

LeftyRighty

Moderator
Founding Member
Joined
Jul 23, 2011
Messages
516
Points
63
Location
west central MO
This is my new fermenting kiln to date – still have to finish the door paint and seal, and a couple other things. After screwing around with an el cheapo styrofoam box & crockpot for 3 years, I can’t wait to get this running. The box is a 15 cu ft upright freezer. Photos of the inside/outside:
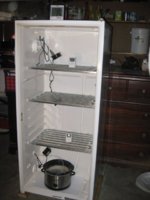
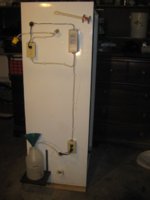
IMG_0222.JPG

IMG_0219.JPG

Starting at the top, inside (next photos)……
There are 2 small computer fans mounted on the back wall, blowing down, low volume – 25 cfm, just enough to keep the air moving. At the very top-left is a ½-inch PVC pipe air outlet (more on this later). The Ranco temperature probe/wire is hanging on the hook. The round metal box contains a water heater high temp thermostat, set at about 130°F – after sealing it in the box, I tested it by connecting a lamp and power, then placed a hot clothes iron against the faceplate – it shut of the lamp after a few seconds. I’ll need to test again after the kiln is finished to determine the exact temp that it will shut off.

IMG_0217.JPG IMG_0213.JPG

At the bottom/inside,
there is the crockpot for my heat and humidity source, and a 3rd small fan blowing across the crockpot. Bottom-left is the fresh air inlet (later).

IMG_0218.JPG


Top outside:
At the top is the ½-inch PVC air outlet with a ball valve control. From previous experience with my old kiln, it’s surprising how much air/humidity can be exhausted with such a small vent. This is how I’ll control the RH – this vent, maybe an offset lid on the crockpot, and restriction of the air inlet at the bottom. This outlet pipe is sloped to drain any condensation.
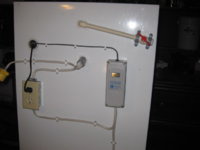
IMG_0220.JPG

More on the top outside:
Far left, the power cord plug (1st mistake - should have extended it to near the floor). The power goes first to the high-temp thermostat – if I have an upset condition, or the Ranco probe gets buried, the power gets shut off to all, so I don’t toast my tobacco.

The power then goes to the fan outlet, they’ll run 24/7. Then to the Ranco ETC-111000 Temp Controller - will be set at 120-125°F range.

Bottom outside photo:
The lower outlet box is controlled by the Ranco - to cycle the crockpot and fan to maintain the proper temp. Note: the power cords pass thru a 1 ¼ inch PVC pipe sleeve, the cords first wrapped with closed-cell sponge foam rubber before stuffed into the sleeve – moisture/air-tight.
(edit) 2nd mistake, but I got lucky. I didn't check the length of the crockpot cord - it just barely reaches the outlet box. I should have mounted the pipe sleeve & outlet box lower.

At the bottom center is the fresh air inlet – 1 ½” PVC pipe/coupling, with a metal screen to keep out bugs/rodents. If I need to restrict air intake, I’ll cover with gauze-cloth.
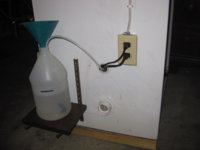
IMG_0221.JPG

Then there is the water supply – water jug on an adjustable shelf, with a siphon hose to the crockpot. The black mark on the jug is at the high water level of the crockpot. I can monitor the water level, and fill the crockpot without opening the kiln door.

It was my intent to keep all the electrical components outside the kiln, except the power cords to the fans/crockpot, for safety reasons. Power to this will be to a GFCI-protected outlet.

I have a set of remote thermometer/hydrometers (1st photo above), so I can monitor the temp/RH without opening the door. With the temp controls and water source outside the kiln, it is conceivable that I can operate this kiln for a full 4-6 week fermentation period without having to open the door even once. But I know I’ll have to inspect the tobacco occasionally, just for my own satisfaction.

The shelves in this kiln are fixed-location, but removable. This will work well for me. After curing, drying and de-ribbing my leaf, I usually pack them into a box to form small bales about 12” x 18” x whatever height – will fit ideal on these shelves. Or I can just pile the leaf on the shelf.
I’m going to install hooks on the top inside, to hang tobacco strings or hands if needed.
Also, I’m going to install clips or hooks at the top-inside of the door – to hang a ringing-wet terrycloth towel – great for bumping the RH to 90-100% to bring leaf into case.

I am open to any comments, critics, or suggestions. I’m not done yet and can still make modifications.
 

johnlee1933

Moderator
Founding Member
Joined
Aug 21, 2011
Messages
3,970
Points
0
Location
Near Danbury, CT
This is my new fermenting kiln to date I am open to any comments, critics, or suggestions. I’m not done yet and can still make modifications.
That is one HELL of a nice job and a fine presentation. My enclosure is similar. The kiln sits outside. I use a Ranco controller. I found that at 125/130F I couldn't get the humidity high enough. I ended up plugging both the air inlet and outlet. With cold outside temps I suspect water was condensing on the walls. If you have low humidity problems you might want to consider the above. -- John
 

LeftyRighty

Moderator
Founding Member
Joined
Jul 23, 2011
Messages
516
Points
63
Location
west central MO
This kiln will be in my attached garage, at 65-70 degrees ambient, so I hope I don't have a RH problem. I do note from my old kiln that keeping the temp lower (115-120) increased the RH. I got a lot of testing to do after I get the door back on.

Sorry about the first 2 photos - tried & tried and couldn't get the photos rotated upright
 

deluxestogie

Administrator
Staff member
Joined
May 25, 2011
Messages
24,723
Points
113
Location
near Blacksburg, VA
The kiln looks excellent and well planned. Be sure to run it for at least a few days without tobacco, in order to out-gas the plasticizer from the Tygon tubing and the PVC parts.

A thought for another safety option would be to replace the "lower element" water heater thermostat with a "single element" water heater thermostat with a button-activated 150ºF built-in circuit breaker.

Since the door seal is critical for stability of both temp and humidity, a fresh, flexible one would be ideal.

As you crank this up, I would suggest starting with all vents blocked, and the Crock Pot set to its lowest output. See what conditions that can maintain, then work from there. If you're using only color-cured leaf, there is probably little need for ventilation.

Nice work!

Bob
 

LeftyRighty

Moderator
Founding Member
Joined
Jul 23, 2011
Messages
516
Points
63
Location
west central MO
thanks for the suggestions Bob...yes, I'm going to take a week or longer warming it up, and seeing what I get temp/RH-wise. The door seal I'm planning on is a new D-shape closed cell sponge EDPM foam rubber.

My neighbor says his mother-in-law has a large chest freezer she wants to get disposed - I've been promised to have it in another couple weeks. I been reviewing your Trash Can Cozy flue-curing chamber, would be nice to convert, even nicer if I can get it running for my 2013 crop. I would appreciate any suggestions you may have on constructing a flue-cure chamber out of a chest freezer. I'm thinking:
- more fans, higher cfm.
- larger crockpot, maybe two.
- fresh air inlet/exhaust on both sides.
- same Ranco Controller, pre-wired, ...no high-temp disconnect.
 
Top