Buy Tobacco Leaf Online | Whole Leaf Tobacco

kiln

deluxestogie

Administrator
Staff member
Joined
May 25, 2011
Messages
24,723
Points
113
Location
near Blacksburg, VA
Leverhead's the technical man for flue-curing components.

Flue-curing begins with fresh, green leaf, so ventilation is an issue for the first few days. By day 3 or 4, the ventilation is likely fully closed. The 33 gallon (between 4.5 and 5 cu. ft.) trash can was able to reach a kill temp of 165ºF with the 2 qt. Crock Pot on low (and bone dry). The volume is not really relevant to the heating energy requirement. Rather, surface area and insulation will determine the energy required.

The fans determine the uniformity of the flue-cure process. I think your greatest challenge will be hanging a generous quantity of leaf in the chest freezer in such a manner that air circulates well.

You can still use a high-temp disconnect, if you purchase the 185ºF industrial water heater thermostat (same cost) discussed in the Cozy Can thread.

The whole chest freezer project should require less than 1 weekend to complete. Given the skill you've displayed in building the kiln, you'll have no difficulty.

An added benefit of flue-curing a portion of your crop is that those plants require no shed space for color-curing.

Bob
 

johnlee1933

Moderator
Founding Member
Joined
Aug 21, 2011
Messages
3,970
Points
0
Location
Near Danbury, CT
The fans determine the uniformity of the flue-cure process. I think your greatest challenge will be hanging a generous quantity of leaf in the chest freezer in such a manner that air circulates well.Bob
I agree. That is a continuing problem for me. -- John
 

leverhead

Well-Known Member
Joined
Jan 16, 2012
Messages
3,204
Points
83
Location
Grimes County Texas
I thought it would take me a few weeks to a couple of months to figure out the problems I had with flue-curing. Three plus months later, I've got it broken down to mechanical, fertilization, plant uniformity and a general lack of experience. Any one of those is enough to drive you nuts on the first run, on later runs when you're just plain tired, it'll make you question you're wisdom. I don't even want to talk about the weather. The first mistake I made is not having enough seedlings to pick from for uniformity, start at least a third more than you need and then be picky about what you plant. I put down equivalent to thirty pounds per acre of nitrogen, I think I should have put down closer to 20. Read the Ag Bulletins about growing a flue-cure crop and guess low, too much Nitrogen makes it hard to yellow. Electricals are pretty straight forward, the mechanicals of how you put it together and isolate the connections can be more difficult than they appear. I started out with basically an electric hair drier and later with heater coils from a cheap one. At high relative humidity, leakage of several to many volts became a problem. Next year I'm going with electric charcoal starters. Stick with induction motors for your blower, brushes only puke when you're not there. Think hard about how you're going to load it uniformly! It's that important! In two different set ups, I had problems with controlling the relative humidity. In the drum the problem was loading it uniformly, In the refrigerator, I didn't have enough leaf to fill it. Dead space is not a good thing. I think I know what a ripe Leaf looks like now, I just don't have any pictures of one. If personal issues don't derail me, I should be able to post some pretty early in the season. In the thread "leverhead's flue-cure experiment" I posted some detail that should be useful. Good luck! I'd like to see a few other people doing this successfully, we can learn from each others mistakes and define what a hobbyist set up should look like. It's beyond me, but the part that would be real nice is an automated temperature cycle. Between work and manually ramping up the temperature, it wore me out.
 
Last edited:

LeftyRighty

Moderator
Founding Member
Joined
Jul 23, 2011
Messages
516
Points
63
Location
west central MO
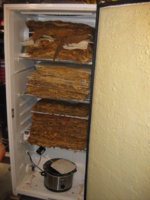
Got my kiln finished, tested and operating, and loaded with 20+ lbs of tobacco - mostly air-cured Virginia's and some Maryland.

IMG_0223.JPG

The Ranco is set for 120-125 degrees, but the real functioning temp range is 117-127 - probably just due to the lag in heat output of the crockpot. This is acceptable. RH is holding consistently at 70%. I am getting some drips from both the fresh air intake/outlets. I thought about taping off part of the air-intake, but am afraid this would just spike the RH, so will run as is. Only need to add about a quart/day of water.
Am very happy with what I got - so much better than the cheap foamboard box I was using.
I luv that I don't need to open the door to add water, and can monitor the temp from outside the kiln.
After just one day, my garage has that wonderful sweet smell of fermenting tobacco.
 

LeftyRighty

Moderator
Founding Member
Joined
Jul 23, 2011
Messages
516
Points
63
Location
west central MO
The kiln has been running for 1 ½ weeks now, and doing great.
An update and a few more adjustments with my fermenting kiln.
- The temp on the lower shelf (above the crockpot) is more than 5-10°F hotter than the top shelf. Not really acceptable, So…….
- I replaced the lowest fan (blowing across the crockpot) with a larger one – 50 cfm. This solved the problem, temps are within a couple degrees top to bottom.
- I may replace the other fans for higher cfm’s also.

- The leaf has been getting way too wet – beyond high-case. RH meter still saying 70% range, and I trust the meters (did the salt brine calibration before starting). No condensation on any walls of the freezer box. I figure the tobacco just wants to suck up moisture.
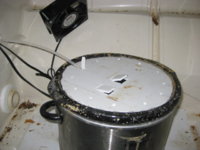
- Put a solid cover over the crockpot (coroplast), with a few small hole from a paper punch and some adjustable slots. RH now in low-50’s, but leaf feels more in proper case.
- IMG_0224.JPG


- I am getting condensate on the inside of the door rubber seal – probably just due the lower insulating difference between this seal and the freezer box. The rest of the box is dry. Decided not to worry about it.

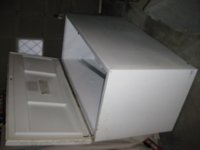
And I got a Xmas gift from my neighbor – a 23 cu ft freezer box.
Am going to start on my flue-curing chamber now, and have until July to get it running
IMG_0225.JPG

(edit) sorry - can't get this 'rotate photo' thing figured out.
 

DrBob

Moderator
Founding Member
Joined
May 26, 2011
Messages
709
Points
28
Location
lewis wisconsin
door seal condensation is normal. Just cant do much about it. I have found that in temperatures below 10f the condensation freezes so bad that it will actually open the door a crack. What a pain in the nuts that is!
 

LeftyRighty

Moderator
Founding Member
Joined
Jul 23, 2011
Messages
516
Points
63
Location
west central MO
I forgot to mention that the big fan blowing over the crockpot, was re-wired to run 24/7. I think that made the biggest difference in the too-hot temp.
 

FmGrowit

Head Honcho
Staff member
Joined
May 17, 2011
Messages
5,289
Points
113
Location
Freedom, Ohio, United States
This is a huge milestone on the forum. Your kiln will most assuredly become the standard all kilns are modeled after. Congratulations on your magnificent achievement.

If you'd like to put a parts list or a parts package together for sale, I'd very much like you to sell them in the Products forum.
 

Knucklehead

Moderator
Founding Member
Joined
Oct 18, 2012
Messages
12,442
Points
113
Location
NE Alabama
I would like to go along with what FmGrowit said because I need another green dot and he has access to the control panel. :eek:

LeftyRighty -- see my previous post. A+
 

LeftyRighty

Moderator
Founding Member
Joined
Jul 23, 2011
Messages
516
Points
63
Location
west central MO
FmGrowit........don't think a 'parts list' would be that much help. Other than the Ranco ETC and White-Rodgers thermostat, everything else is standard hardware store and/or electrical components. Comparable thermostat can be had at any plumbing supply. The fans I used are Mechatronics computer fans, kinda pricey, and I'm sure there are cheaper options on ebay or local computer shops.
thanks for the compliment and suggestion..
 

johnlee1933

Moderator
Founding Member
Joined
Aug 21, 2011
Messages
3,970
Points
0
Location
Near Danbury, CT
FmGrowit........don't think a 'parts list' would be that much help. Other than the Ranco ETC and White-Rodgers thermostat, everything else is standard hardware store and/or electrical components. Comparable thermostat can be had at any plumbing supply. The fans I used are Mechatronics computer fans, kinda pricey, and I'm sure there are cheaper options on ebay or local computer shops.
thanks for the compliment and suggestion..
Low to high volume 120 VAC muffin fans are available pretty inexpensively. I have mine set to run when the crock pot is heating. -- John
 

FmGrowit

Head Honcho
Staff member
Joined
May 17, 2011
Messages
5,289
Points
113
Location
Freedom, Ohio, United States
FmGrowit........don't think a 'parts list' would be that much help.

I guess I'm envisioning buying a box full of part to make a kiln, where all I have to do is drill some wholes in a freezer, find a crock-pot and install the parts.

I know I would buy one (box of parts), so I'm guessing others would too.
 

Boboro

Well-Known Member
Joined
Sep 5, 2011
Messages
4,530
Points
83
Location
Wren Mississippi
I think the best most affordable parts in one place would sell with wirein diagrams and maby a Utube puttin it togeter.
 

DrBob

Moderator
Founding Member
Joined
May 26, 2011
Messages
709
Points
28
Location
lewis wisconsin
I first posted the information on my crockpot heated curing chamber on Sept 07 2009. I read a lot of previous posts on htgt and spent the summer of 2009 designing my own curing chamber. The use of an upright freezer was a no brainer, I got my freezer at a local tavern. I was just sitting there drinking a beer and the appliance man showed up with a new freezer. I asked the owner what he was going to do with the old one. He replied that the appliance dealer was going to dispose of it for $20.00.. I replied that I would take it if he would give me a 12 pack. He offered me 12 glasses of beer and we had a deal! (he gave me chips)
I tried many ways of heating the thing in the next month or so, Heat wasnt a problem, Humidity was the problem. Humidifiers just were not designed to work in a 120 degree enviornment. A couple of weeks later I was disccussing my project to a neighbor Bill Chapman and he said TRY A CROCKPOT!
Why I did'nt think of that I don't know. Within a couple of days I had my original Dr. Bob's crockpot heated curing chamber built. It was completed August 7 2009 and I test ran it for 30 days and posted my results on sept 7 2009. It remains pretty much unchanged today and has been working very well since. I still use a lower element electric water heater thermostat to control the heat, and to control the humidity I adjust the air vent to control the humidity. I do not have a humidity gauge anymore, I just go by feel, if too wet I increase the air bleed, and if too dry I decrease the air bleed.
Lefty Righty has built an excellent curing chamber. The only things I would change are I would put the air vent on the top of the freezer instead. That is where the extra moisture wants to go. Think clouds! The door seal also needs a little help and I just added a couple of bungee cords to help keep the door tight. A bad door seal causes dry conditions.

Job well done leftright

Dr.Bob
 

johnlee1933

Moderator
Founding Member
Joined
Aug 21, 2011
Messages
3,970
Points
0
Location
Near Danbury, CT
I first posted the information on my crockpot heated curing chamber on Sept 07 2009. I read a lot of previous posts on htgt and spent the summer of 2009 designing my own curing chamber. The use of an upright freezer was a no brainer, I got my freezer at a local tavern. I was just sitting there drinking a beer and the appliance man showed up with a new freezer. I asked the owner what he was going to do with the old one. He replied that the appliance dealer was going to dispose of it for $20.00.. I replied that I would take it if he would give me a 12 pack. He offered me 12 glasses of beer and we had a deal! (he gave me chips)
I tried many ways of heating the thing in the next month or so, Heat wasnt a problem, Humidity was the problem. Humidifiers just were not designed to work in a 120 degree enviornment. A couple of weeks later I was disccussing my project to a neighbor Bill Chapman and he said TRY A CROCKPOT!
Why I did'nt think of that I don't know. Within a couple of days I had my original Dr. Bob's crockpot heated curing chamber built. It was completed August 7 2009 and I test ran it for 30 days and posted my results on sept 7 2009. It remains pretty much unchanged today and has been working very well since. I still use a lower element electric water heater thermostat to control the heat, and to control the humidity I adjust the air vent to control the humidity. I do not have a humidity gauge anymore, I just go by feel, if too wet I increase the air bleed, and if too dry I decrease the air bleed.
Lefty Righty has built an excellent curing chamber. The only things I would change are I would put the air vent on the top of the freezer instead. That is where the extra moisture wants to go. Think clouds! The door seal also needs a little help and I just added a couple of bungee cords to help keep the door tight. A bad door seal causes dry conditions.

Job well done leftright

Dr.Bob
I remember that post well because I used it to build an almost exact replica. The only improvement was to upgrade to the Ranco controller from the hot water heater thermostat. I put a padlock hasp and on the door to keep it firmly closed. The freezer was old and I spent some time cleaning the magnetic seal and door frame to get a satisfactory seal. It must still have some leaks somewhere because I had to close the recommended vent holes to keep my humidity up. The only problem I have is Energy related. My kiln is outdoors and it gets COLD here. I am in the process of adding insulation to keep the costs down. Right now it is scrap 2" foam board just duct taped on. It will get cleaned up so it is not such and eyesore. -- John
 

Boboro

Well-Known Member
Joined
Sep 5, 2011
Messages
4,530
Points
83
Location
Wren Mississippi
2" foam board is needed put it on with Liq. Nails for tub surrounds. It dont eat styrofoam.Looks like the ppl. that make freezers would put some more inslation on them but they are very poorly inslalated. And that heat cost a lot of $.
 

johnlee1933

Moderator
Founding Member
Joined
Aug 21, 2011
Messages
3,970
Points
0
Location
Near Danbury, CT
2" foam board is needed put it on with Liq. Nails for tub surrounds. It dont eat styrofoam.Looks like the ppl. that make freezers would put some more inslation on them but they are very poorly inslalated. And that heat cost a lot of $.
You got that exactly right. Thanks for the Liquid Nails tip. I have some around here someplace. How long does that take to set up and can I use it in the cold? I might be able to get a pretty decent looking job that way. A coat of paint and I'd be all set.-- J
 
Top